Component Development Tutorial
![]() This documentation is for an older version of ZK. For the latest one, please click here.
This documentation is for an older version of ZK. For the latest one, please click here.
Grace Lin, Engineer, Potix Corporation
March 21, 2008
Applicable to ZK 2.0 and later
Introduction
A component consists of two parts: view and handle. They are like two sides of the same coin. The view is the visual part of a component, which is running at the browser and interacts with the user. The handle is a Java object running at the server and interacts with the application.
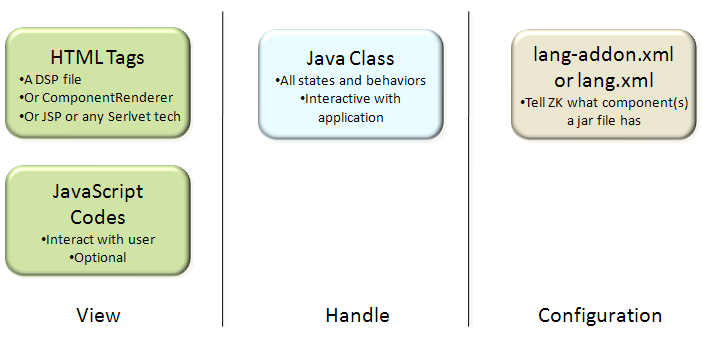
The development of a component is all about to implement its handle by use of a Java class, to implement at least one view with a DSP file (or other Servlet technology) and then provide a configuration file to specify all component definitions a JAR file contains. We call it "Component Development Trilog" as shown below. In this articule, we will write a simple button as an example.
Component Development Trilogy
The Handle (Java Class)
- We can write component to extend from one of the following class, and decide one by what function you want.
- 1. AbstractComponent
- A skeletal implementation of Component.
- 2. HTMLBasedComponent (extends AbstractComponent)
- It simplifies to implement methods common to HTML based components.
- It supports
- 3. XulElement (extends HTMLBasedComponent)
- The fundamental class for XUL elements.
- It supports
- Mouse event, like getAllOnClickAttrs(boolean)
- Pop-up, tooltip, context menu, like getPopup(), getTooltip(), getContext()
- Client side action, like getAction()
- Our button will detect mouse event, so we have to extend it from org.zkoss.zul.impl.XulElement and use its method 「getAllOnClickAttrs(boolean)」 to returns mouse event attributes. Each ZK component is in fact a Twins. It is composed of the browser side JavaScript and HTML codes and the server side Java classes. So if server wants to notify the client the value of an attribute is changed, it should invoke the smartUpdate() method. Like the example below.
public class MyButton extends XulElement {
	private String _value = "I am a button";
	public void setValue(String value) {
	_value = value;
	smartUpdate("val", _value);
	}
	public String getValue() {
	return _value;
	}
	public String getOuterAttrs() {
	final String attrs = super.getOuterAttrs();
	final String clkattrs = getAllOnClickAttrs(false);
	return clkattrs == null ? attrs: attrs + clkattrs;
	}
}
- The smartUpdate is used by the ZK server to send command back to the browser in an Ajax response. Notice that for each http request, command with same name will be sent only once. In one event handling (one XMLHttpRequest) if the Java API called the smartUpdate with same command name more than once, only the last one is sent.
The View
HTML Tags
- There are some method can be used to generate the final HTML tags that will be read by the browser: a DSP file, a Renderer, JSP, or anything. A dsp file used in ZK is a template file similar to a typical jsp file. Refer to ZK Developer's Reference for details. However, you could use JSP or other technologies, if you would like to. The following file is a template to generate the corresponding HTML tags for each MyButton component.
<%@ taglib uri="http://www.zkoss.org/dsp/web/core" prefix="c" %>
<%@ taglib uri="http://www.zkoss.org/dsp/zk/core" prefix="z" %>
<c:set var="self" value=""/>
<div id="" z.type="comptutor.comptutor.MyButton">

</div>
- You must group the generated HTML tags under one HTML tag, because ZK Update Engine assumes it. If your component consists of multiple parts, you could use SPAN or DIV to group them. The topmost HTML tag must have the id attribute and the value must be the component's UUID. The self is the MyButton Java object. The key part in the above code is this attribute z.type. It uses the pattern of name specifies JavaScript object.("PackageName.FileName.JavascriptObjectName"). In this case, we specify comptutor.comptutor.MyButton. It means the JavaScript codes are located at the file /web/js/comptutor/comptutor.js, and this file must be loaded when the MyButton component is encountered. It also means the JavaScript method called zkMyButton.init must be called, when any instance the MyButton component is created.
JavaScript Methods
- It is common that we have to provide some JavaScript codes to handle the behavior of a component at the client. As we mentioned above, the name of JavaScript object must add a prefix name with zk, the zkType's "Type" is decide by your component such like "zkMyButton".
- zkType.init = function (cmp) {}
- It will be called after the HTML tags are rendered.
- zkType.cleanup = function (cmp) {}
- It will be called just before the HTML element is to be removed.
- zkType.setAttr = function (cmp, nm, val) {}
- The component uses smartUpdate to notify the client what attribute to modify, and ZK client engine will use JavaScript object which is predefine in the z.type property to catch the command of smartUpdate by the setAttr function.
- zkType.init = function (cmp) {}
- In this example, the JavaScript file is called comptutor.js. Its content is straightforward.
zkMyButton = {};
zkMyButton.setAttr = function (cmp, nm, val) {
	if (nm === "val") {
	/* remove all component's children,
	and add new value as child of component.
	*/
	for (var n = cmp.firstChild; n;) {
	var p = n.nextSibling;
	n.parentNode.removeChild(n);
	n = p;
	}
	cmp.appendChild(document.createTextNode(val));
	return true;
	}
	return false;
};
- The setAttr function accepts three arguments. The first is the HTML element that holds the component id (the HTML tag). The second is the attribute name(or command name). The last is the attribute value. We use the if/else statement to check which name of command is what we care. This method could return true to notify ZK Client Engine that the attribute has been updated, or false to notify that ZK Client Engine shall handle it. You could explode more attribute to the Mybutton component by intercepting more attributes here.
- The setAttr function accepts three arguments. The first is the HTML element that holds the component id (the
Configuration
- Finally, set the configuration by writing lang-addon.xml to register the new ZK component. That makes ZK engine knows how to access and use it. It must be put under the /metainfo/zk directory locatable by the Java classpath, and one per jar file.
- A lang-addon.xml can register any number of components that will be added to an existent language as depicted below.
<language-addon>
	<!-- The name of this addon. It must be unique -->
	<addon-name>comptutor</addon-name>
	<!-- Specifies what other addon this depends
	<depends></depends>
	-->

	<!-- Which language this addon will be added to -->
	<language-name>xul/html</language-name>

	<version>
	<version-class>org.zkforge.comptutor.Version</version-class>
	<version-uid>1.0.0</version-uid>
	<zk-version>3.0.0</zk-version><!-- or later -->
	</version>

	<zscript language="Java">
	import org.zkforge.comptutor.*;
	</zscript>

	<component>
	<component-name>mybutton</component-name>
	<component-class>org.zkforge.comptutor.MyButton</component-class>
	<mold>
	<mold-name>default</mold-name>
	<mold-uri>~./comptutor/mybutton.dsp</mold-uri>
	</mold>
	</component>
</language-addon>
Element description:
- <addon-name>
- The name of this language addon. In this case is "comptutor", and other like Google Maps component the addon-name of which is gmapsz. It must be unique.
- <language-name>
- Specifies the language to which the components shall be added.
- A language is defined by a file called lang.xml. Its format is similar but it assumes the specified language doesn't exist yet.
- The examples given above is xul/html, and you also can use zul or zhtml.
- <zscript>
- Specifies any Java codes that need to execute (via BeanShell) before interpreting a page. For example, if you want to import some java package, like java.util, you can write on here. :Our example here is import org.zkforge.comptutor.* .
- <component>
- Defines a component by specifying the component name and the Java class to use. You could define as many as component as you want. The component-name is the zul tag name used in designing zul pages. We define it as "mybutton" here.
- <component><mold>
- A component might have zero, one or multiple molds. If it doesn't have any mold, it has to take care of rendering by overriding the redraw() method. If it does, the mold specified here will be used to render the component into HTML tags. The mold called default is the default mold.
Use the Component
After write done the component, package component in a JAR file, and put jar file in your web application(/WEB-INF/lib/). Then, you can use the new component in ZK, like the following zul file – 「mybutton.zul」.
<zk>
	<mybutton id="m" onClick='alert("hi")' />
	<button label="Change Label" onClick='m.value = "super button"' />
</zk>
Run the server, you will see button on the page.
The above one is MyButton, and click it will show message 「hi」. You also can use other button to change MyButton』s value.
Source Code
You can get the source codes of MyButton example by browsing them on-line, or checking out with SVN at the following URL.
How to run the sample code
For user want to add some customized component to his dynamic web project. You can try the following steps.
1. Create a new dynamic web project. Remember to use ZK studio to add ZK support. It will create zk.xml.
2. In zk.xml, add following code and ZK can find the lang-addon.xml
<language-config>
    <addon-uri>/WEB-INF/zk/lang-addon.xml</addon-uri>
</language-config>
3. Copy the lang-addon.xml under folder /WebContent/WEB-INF/zk
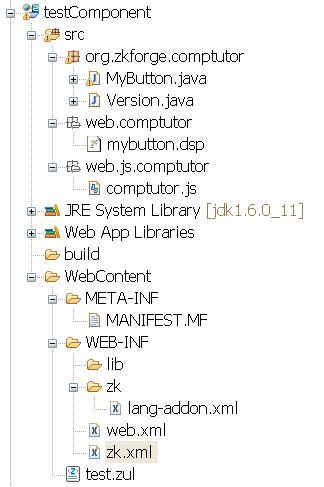
4. Copy mybutton.dsp, comptutor.js to folder src/web. The result path should be like following picture.
5. You should be able to use <mybutton> now.
Some note about path convention:
- 1."~." in lang-addon.xml means resource folder. ZK framework will mapping it to /web/ folder of locatable jar file. src folder of dynamic web project can be treated as a jar file. Therefore you can put dsp file and js file under the folder.
- 2.In mybutton.dsp, you can see
z.type="comptutor.comptutor.MyButton"
- It's also ZK's convention to search related js file under /web/js/
Summary
ZK has been deliberately designed to simplify not only the application development, but also the component development. As shown in this example, the development process of a component is as simple as four steps.
- Defines the name, class and mold (aka., template) in lang-addon.xml.
- Provides a mold for generating corresponding HTML tags for a component.
- Provides a Java class to represent the behavior of a component.
- Provides a optional JavaScript code to handle specific commands sent by the Java class.
We welcome your contribution to integrate more components into ZK framework. If you come up with any problem, feel free to ask us on ZK forum.
| Copyright © Potix Corporation. This article is licensed under GNU Free Documentation License. |

