Template:Tutorial common chapters
Objectif du tutoriel
Notre application consiste simplement en un catalogue de voitures. Cette application a deux fonctions:
- Chercher des voitures.
- Entrez un mot-clé dans le champ d'entrée, cliquez Search et les résultats seront affichés dans la liste en dessous.
- Voir les détails.
- Cliquez sur un élément de la liste, la zone sous la liste de voiture affichera alors les détails de la voiture sélectionnée dont le modèle, le prix, une description et un aperçu.

Échauffement
Cette section vous guide pour mettre en place un projet et utiliser ZK dans Eclipse. Si vous voulez d'abord savoir comment construire l'application avec ZK, démarrez d'abord depuis Declaring Domain Class. Pour commencer, nous allons voir comment préparer un environnement pour construire une application web ZK à savoir configurer l'IDE, installer ZK et lancer l'application dans un serveur.
Configurer Eclipse
Dans ce tutoriel, Eclipse IDE 3.7 (indigo) pour Java EE developer ![]() est utilisé pour montrer la construction de l'application 'catalogue de voitures'. (Télécharger Eclipse ici, extraire le fichier zip téléchargé dans un dossier et exécuter eclipse.exe pour lancer Eclipse.)
est utilisé pour montrer la construction de l'application 'catalogue de voitures'. (Télécharger Eclipse ici, extraire le fichier zip téléchargé dans un dossier et exécuter eclipse.exe pour lancer Eclipse.)
Pour pouvoir éditer les pages ZK UI dans Eclipse, ajoutez "zul" (nom des extensions des fichiers ZK UI) comme type de contenu de format XML en suivant les étapes suivantes:
- Sélectionnez Window \ Preferences pour ouvrir la fenêtre Preferences
- À gauche, sélectionnez General --> Content Types'. À droite, ouvrez le nœud Text dans la boîte "Content types" et sélectionnez XML
- Cliquez sur Add et ajoutez le type de contenu que vous souhaitez ajouter à savoir *.zul dans ce cas-ci, ensuite cliquez sur OK

Une fois ceci terminé, Eclipse va utiliser l'éditeur XML pour ouvrir votre fichier zul.
Installer ZK dans un Web Project
Télécharger ZK
Téléchargez d'abord le ZK CE (le nom du fichier sera du genre zk-bin-[version].zip) et extrayez le dans un dossier.
Créer un Project
Pour construire une application web, il faut d'abord créer un "Dynamic Web Project" dans Eclipse:
- Sélectionnez File \ New \ Dynamic Web Project
- Entrez tutorial comme nom du Project et laissez le reste par défaut.

- Vous pouvez laisser "Target runtime" à "none".
- Notez que l'on met la valeur de Dynamic web module version à 3.0 parce-que nous voulons utiliser Servlet 3.0 pour supprimer la configuration de l'application.
Installer ZK JAR
Pour utiliser ZK dans votre projet, vous devez copier les fichiers ZK JAR dans le dossier des librairies de votre projet.
Copiez les fichiers JAR depuis le répertoire suivant vers WebContent\WEB-INF\lib:
- {YOUR_ZK_UNZIP_FOLDER}\dist\lib
- {YOUR_ZK_UNZIP_FOLDER}\dist\lib\ext
![]() Si vous préférez utiliser un serveur d'applications qui supporte des spécifications Servlet (< 3.0) plus anciennes ou JDK 1.5, vous devez ajouter des configurations supplémentaires dans web.xml. Merci de vous référer au Guide d'Installation ZK. [1]
Si vous préférez utiliser un serveur d'applications qui supporte des spécifications Servlet (< 3.0) plus anciennes ou JDK 1.5, vous devez ajouter des configurations supplémentaires dans web.xml. Merci de vous référer au Guide d'Installation ZK. [1]
Créer une page simple
Après l'installation, vous pouvez créer un zul simple pour vérifier que l'installation fonctionne correctement.
Dans Eclipse,
- Sélectionnez File \ New \ File (or File \ New \ Other \ File ) pour ajouter un nouveau fichier, hello.zul, dans WebContent.
- Cliquez sur Source pour modifier la source.
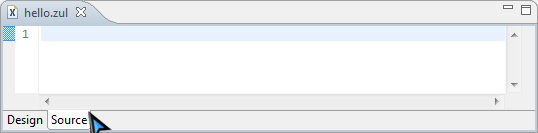 creating a zul-file in eclipse's xml editor
- Copiez et collez l'extrait de code suivant dans hello.zul et enregistrez.

hello.zul
 <window title="My First ZK Application" border="normal">
 	Hello World!
 </window>
Maintenant, dans la vue Project Explorer, votre projet devrait ressembler à ceci:

Si vous ne trouvez pas la vue Project Explorer, sélectionnez le menu Window \ Show View \ Project Explorer pour l'ouvrir.
Lancer une Application
Avant de lancer une application web, nous devons créer un serveur dans Eclipse. Sélectionnez Window \ Preferences pour ouvrir la fenêtre Preferences et sélectionnez Server \ Runtime Environments sur la gauche. Cliquez sur Add pour ajouter un environnement d'exécution de serveur.

Sélectionnez Apache \ Tomcat v7.0 Server vu qu'il supporte Servlet 3.0 et cochez Create a new local server, cliquez ensuite sur Next.
![]() Si vous utilisez JDK 1.5, vous pouvez utiliser Tomcat v6.0 mais il faudra faire davantage de configurations dans web.xml. Merci de voir le ZK Installation Guide dans References .
Si vous utilisez JDK 1.5, vous pouvez utiliser Tomcat v6.0 mais il faudra faire davantage de configurations dans web.xml. Merci de voir le ZK Installation Guide dans References .

Si vous avez précédemment installé Tomcat 7, fournissez simplement le chemin du répertoire. Si vous ne l'avez pas, suivez les étapes suivantes:
- Cliquez sur Download and Install et choisissez un répertoire.
- Notez que le chemin d'installation ne peut contenir aucun caractère non-ASCII.
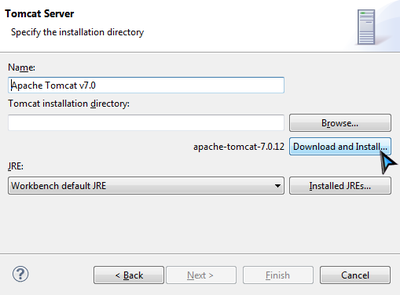
- Acceptez la licence et attendez.
- Eclipse affichera un message d'erreur avant que l'installation ne s'achève, ignorez le.

- Patientez et n'interrompez pas l'installation pour être certain qu'elle s'effectue correctement.

- Eclipse va télécharger et installer Tomcat dans le dossier que vous avez spécifié.
- Lordque l'installation est finie, cliquez sur Finish


Vous devriez maintenant voir une nouvelle entrée dans Server runtime environments.

Faites un clique droit sur hello.zul et sélectionnez Run As \ Run on Server pour faire tourner ce zul sur un serveur d'applications.

Choisissez un Tomcat 7. Vous pouvez aussi cocher l'option Always use this server when running this project pour ne pas devoir choisir un serveur à chaque fois que vous lancerai l'application par la suite. Cliquez sur Finish et attendez que le serveur démarre.

Une fois le serveur démarré, Eclipse va ouvrir un browser et vous connecter automatiquement à http://localhost:8080/tutorial/hello.zul . Si vous voyez l'image suivante, alors votre projet est prêt pour utiliser ZK.

Vous pouvez revenir ici et suivre à nouveau ces étapes pour lancer votre application au cours de ce tutoriel
Importer et lancer l'Application exemple
Nous avons préparé un ficher zip projet Eclipse qui contient le code source complet, vous pouvez le télécharger et l'importer dans votre Eclipse sans avoir à démarrer tout de 0.
Pour utiliser l'application exemple, suivez les étapes suivantes:
- Téléchargez le fichier zip du projet.
- Dans Eclipse, sélectionnez File \ Import \ General \ Existing Projects into Workspace, choisissez Select archive file pour importer le zip de l'application comme projet dans Eclipse.
- Suivez ensuite les instructions de Run an Application pour lancer l'application.
Declaring Domain Class
The following is the domain object that represents a car.
public class Car {
	private Integer id;
	private String model;
	private String make;
	private String preview;
	private String description;
	private Integer price;
	//omit getter and setter for brevity
}
- Please refer to References section to see the complete code. [2]
We then define a service class to perform the business logic (search cars) shown below:
public interface CarService {

	/**
	 * Retrieve all cars in the catalog.
	 * @return all cars
	 */
	public List<Car> findAll();

	/**
	 * search cars according to keyword in  model and make.
	 * @param keyword for search
	 * @return list of car that match the keyword
	 */
	public List<Car> search(String keyword);
}
In this example, we have defined a class - CarServeImpl that implements the above interface. For simplicity, it uses a static list object as the data model. You can rewrite it so that it connects to a database in a real application. Implementation details are not in the scope of this article, please refer to References section.[3]
Building the User Interface
UI Design is a good start to building an application as it helps you define the scope of your application. ZK provides hundreds of readily-made UI components so developers can rapidly build their desired user interface by combining and mix matching these components without having to create them from scratch.
In ZK, you can use ZK User Interface Markup Language (ZUML) [4], an XML-formatted language, to describe UI. By ZK's convention, the files to describe user interface with ZUML uses .zul as the name suffix. In zul files, one component can be represented as an XML element (tag) and you can configure each component's style, behavior, and function by setting XML element's attributes.[5]
In the case of this example application, first of all, we want to design a window with specified title and normal border as our application's frame.
Extracted from search.zul
	<window title="Search" width="600px" border="normal">
		<!-- put child components inside a tag's body -->
	</window>
As window is the outermost component, it is called the root component. Window is a commonly used container because it is a basic display element of a desktop-like application while it can also enclose other components. All other components inside window are called child components and should be put in window tag's body. We set window's title bar text with "title" attribute and make window display a normal border with "border" attribute. For "width" attribute, use CSS like syntax such as "800px" or "60%".
Basically, our example application's user interface is divided into 3 areas within the window, they are (from top to bottom) search function, car list, and car details.

Search Area:
ZK components are like building blocks, you can combine and mix match existing components to construct your desired UI. To allow users to search, we need a text to prompt users for input, a place to enter keywords, and a button for triggering the search. We can use the following ZK components to fulfill this requirement:
Extracted from search.zul
	 	<hbox align="center">
	 		Keyword:
	 		<textbox id="keywordBox" />
	 		<button id="searchButton" label="Search" image="/img/search.png" />
	 	</hbox>
hbox is a layout component that arranges its child components horizontally and you can probably guess by now that the h represents horizontal. As these child components have different heights, we set the "align" attribute to "center" so they are aligned neatly along their center line. Here we also specify an "id" attribute for some components which allows you to control them by referencing their id. You can also easily create an image button by specifying the path for the "image" attribute.
Car List Area. ZK provides several components to display a collection of data such as listbox, grid, and tree. In this example, we have chosen to use a listbox to display a list of cars with 3 columns: Model, Make and Price. We set the "height" attribute so the number of rows visible is limited with respect to the height specified; you can drag scroll-bar to see the rest of rows. The "emptyMessage" attribute is used to show a message when listbox contains no items. The listbox is a container component, and you can add listhead to define a column. The listitem is used to display data, and the number of listcell in one listitem should equal to the number of listheader. Here we use listcell with static label to demonstrate structure of a listitem, and we'll talk about how to create listitem dynamically with respect to each data object in the next chapter.
Extracted from search.zul
	 	<listbox id="carListbox" height="160px" emptyMessage="No car found in the result">
			<listhead>
				<listheader label="Model" />
				<listheader label="Make" />
				<listheader label="Price" width="20%"/>
			</listhead>
			<listitem>
				<listcell label="car model"></listcell>
				<listcell label="make"></listcell>
				<listcell>$<label value="price" /></listcell>
			</listitem>
		</listbox>
Car Details Area. Like the hbox, vbox is also a layout component which arranges its child component in vertical order. By combing these 2 layout components, we can present more information on a screen. The "style" attribute allows you to customize component's style with CSS syntax.
Extracted from search.zul
		<hbox style="margin-top:20px">
			<image id="previewImage" width="250px" />
			<vbox>
				<label id="modelLabel" />
				<label id="makeLabel" />
				<label id="priceLabel" />
				<label id="descriptionLabel"/>
			</vbox>
		</hbox>
You can see the complete zul file through the link in the References section. [6]