Performing Actions on Events
Redirect page
Redirect to:
![]() This article is out of date, please refer to http://books.zkoss.org/zkessentials-book/master/ for more up to date information.
This article is out of date, please refer to http://books.zkoss.org/zkessentials-book/master/ for more up to date information.
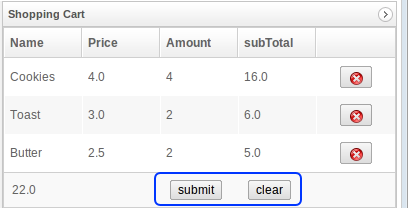
The previous section outlined how to push and pull data to and from the View Model. This section discusses how to catch events such as a button click in our Shopping Cart View under the MVVM pattern.
The @command Annotation
The method for invoking a command is rather simple and just requires two steps.
- Register the command on the event in the ZUL file
- Write a function in the View Model which will be fired when the command arrives
Both steps are exceptionally easy providing greater productivity to developers. The first step is demonstrated below:
<button id="submitOrderBtn" label="submit" onClick="@command('submitOrder')" />
In the above snippet a command is assigned to the button's onClick method. This command is named "submitOrder". On clicking the button the event will be fired and the command "submitOrder" will be passed to the binder. The binder will then attempt to execute the respective command from the View Model. Therefore one needs to exist. There are two ways to implement the command in the View Model:
- Make the method name match the commmand name and annotate the method with @command
- Annotate the function with @command("submitOrder")
In this case the author chose to match the method name with the command name "submitOrder"
@Command
@NotifyChange({"cartItems", "shoppingCart", "orderNote"})
public void submitOrder() {
	DAOs.getOrderDAO().createOrder(UserUtils.getCurrentUserId(), getCartItems(), getOrderNote());

	...

	clearOrders();
}
The method in the View Model will therefore be called when the button is clicked. A keen observer may have noticed the @NotifyChange annotation on the method, the following section discusses this and the uses of it.
The @NotifyChange Annotation
The @NotifyChange annotation's purpose is funamental, if a method which is called by the binder changes a property that is bound then the developer needs to specify that. In the example below the code will change the property cartItems, shoppingCart and orderNote therefore these are included in the @NotifyChange annotation.
@Command
@NotifyChange({"cartItems", "shoppingCart", "orderNote"})
public void submitOrder() {
	DAOs.getOrderDAO().createOrder(UserUtils.getCurrentUserId(), getCartItems(), getOrderNote());

	...

	clearOrders();
}
Notify change can adjust the value of one property, @NotifyChange("property"), more than one property @NotifyChange({"one", "two"}) and all properties @NotifyChange("*").
Note here that cartItems, shoppingCart and orderNote are properties of ShoppingCartViewModel implemented as getter methods and/or fields.
This now enables developers to write effective commands, though this is not the end of the power available. It is also possible to pass parameters to command methods.
Passing Information to @Command
Sometimes one will want to pass parameters to a command method, this can be done painlessly. Take the orders list for example as an example when pressing the red cross button the item should be deleted, to do this the easiest way is to pass the item to the command ready for it to be deleted at the backend. The item can be passed to the command using the following syntax:
<template name="model" var="cartItem">
	<listitem>
		<listcell label="@load(cartItem.product.name)" />
		<listcell label="@load(cartItem.product.price)" />
		<listcell label="@load(cartItem.amount)" />
		<listcell
			label="@load(cartItem.product.price * cartItem.amount)"
			style="word-wrap: word-break" />
		<listcell>
			<button
				image="/image/DeleteCross-16x16.png"
				onClick="@command('deleteOrder', cartItem=cartItem)" />
		</listcell>
	</listitem>
</template>
Line 12 demonstrates the syntax, @command is used as normal but there is an extra attribute added, in this case it is cartItem=cartItem, the basic syntax is as follows:
nameThatYouAssign=variable
In the above case the template is defining the variable name to access the active bean as cartItem. This value can then be retrieved in the View Model using the command function and a parameter prepended with the annotation @BindingParam. Below shows this method at work.
@Command
@NotifyChange({"cartItems", "shoppingCart"})
public void deleteOrder(@BindingParam("cartItem") CartItem cartItem) {
	getShoppingCart().remove(cartItem.getProduct().getId());
}
The @BindingParam annotation specifies the name as "cartItem" this corresponds to the name as defined in the UI. After doing this the variable is accessible in the function with no further effort needed.
This concludes the teaching of knowledge on how to implement both the MVC and MVVM patterns for the product view, shopping cart and orders list. The last question is how do these 3 sections communicate. The product view uses MVC but needs to tell the shopping cart (which uses MVVM) that a product has been added to the order and the shopping cart needs to tell the orders list that there is a new order even though they both use different View Models.
The next session introduces how to do this.
