Get ZK Up and Running with MVVM fr"
| Line 215: | Line 215: | ||
Dans cet exemple, nous avons défini une classe - <tt>CarServeImpl</tt> qui implémente l'interface ci-dessus. Par soucis de simplicité, elle utilise une liste objet statique comme modèle de données. Vous pouvez la réécrire de sorte qu'elle se connecte à une base de données dans une application réelle. Les détails de l'implémentation ne sont pas l'objet de cet article, merci de vous référer à la section References.<ref> [https://code.google.com/p/zkbooks/source/browse/trunk/gettingStarted/getZkUp/src/tutorial/CarService.java CarService.java] [https://code.google.com/p/zkbooks/source/browse/trunk/gettingStarted/getZkUp/src/tutorial/CarServiceImpl.java CarServiceImpl.java] </ref> | Dans cet exemple, nous avons défini une classe - <tt>CarServeImpl</tt> qui implémente l'interface ci-dessus. Par soucis de simplicité, elle utilise une liste objet statique comme modèle de données. Vous pouvez la réécrire de sorte qu'elle se connecte à une base de données dans une application réelle. Les détails de l'implémentation ne sont pas l'objet de cet article, merci de vous référer à la section References.<ref> [https://code.google.com/p/zkbooks/source/browse/trunk/gettingStarted/getZkUp/src/tutorial/CarService.java CarService.java] [https://code.google.com/p/zkbooks/source/browse/trunk/gettingStarted/getZkUp/src/tutorial/CarServiceImpl.java CarServiceImpl.java] </ref> | ||
| − | = | + | =Construire l'interface utilisateur = |
| − | UI | + | Le design de l'UI est un bon début pour construire une application vu qu'il vous aide à définir l'étendue de votre application. ZK fournit des centaines de composants UI prêts à l'emploi de sorte que les développeurs peuvent rapidement construire l'interface utilisateur de leur choix en combinant et en mélangeant ces composants sans avoir à les créer. |
| − | + | Dans ZK, vous pouvez utiliser ZK User Interface Markup Language (ZUML) <ref> [[ZUML Reference|ZUML Reference]] </ref>, un langage formaté XML, pour décrire les UI. Suivant la convention ZK, les fichiers décrivant les UI avec ZUML utilisent comme suffixe '''.zul'''. Dans les fichiers zul, un composant peut être représenté comme un élément XML (tag) et vous pouvez configurer pour chaque composant son style, son comportement et sa fonction via les attributs XML de cet élément.<ref> [[ZK Component Reference|ZK Component Reference]] </ref> | |
| − | + | Dans cet exemple, nous voulons d'abord concevoir une fenêtre avec un titre spécifique et un bord normal qui sera la fenêtre de notre application. | |
| − | ''' | + | '''Extrait de search.zul''' |
<source lang="xml"> | <source lang="xml"> | ||
| Line 232: | Line 232: | ||
</source> | </source> | ||
| − | + | Vu que ''window'' est le composant 'englobant' principal, il est appelé ''root component''. ''Window'' est un container souvent utilisé parce-que c'est un élément d'affichage de base d'une application de type bureau et qui peut en même temps contenir d'autres composants. Tous les autres composants inclus dans ''window'' sont appelés ''child components'' et doivent être placés dans le body de la fenêtre. Nous mettons un texte dans la barre de titre de ''window'' grâce à l'attribut "title" et nous faisons en sorte que ''window'' s'affiche avec un bord normal grâce à l'attribut "border". Pour l'attribut "width", utilisez une syntaxe de type CSS comme "800px" ou "60%". | |
| − | + | De base, l'UI de notre application est divisée en 3 zones à l'intérieur de ''window'' qui sont, de haut en bas, la fonction de recherche, la liste des voitures et les détails de la voiture. | |
[[File:Tutorial-ui-3areas.png | 400px |center]] | [[File:Tutorial-ui-3areas.png | 400px |center]] | ||
| − | ''' | + | '''Zone de recherche:''' |
| − | ZK | + | Les composants ZK sont comme des blocs à construire, vous pouvez combiner et mélanger les composants existants pour construire l'UI de votre choix. Pour permettre aux utilisateurs d'effectuer des recherches, il faut un texte incitant les utilisateurs à entrer une valeur, un endroit pour qu'ils tapent effectivement cette valeur-clé et un bouton qui va déclencher la recherche. Nous pouvons utiliser dans ce but les composants ZK suivants: |
| − | ''' | + | '''Extrait de search.zul''' |
<source lang="xml"> | <source lang="xml"> | ||
| Line 254: | Line 254: | ||
</source> | </source> | ||
| − | <tt>hbox</tt> | + | <tt>hbox</tt> est un composant de layout qui organise ses enfants de manière horizontale et vous avez donc deviné que le '''h''' signifie ''horizontal''. Vu que ces composants enfants ont des hauteurs différentes, nous mettons la valeur "center" à l'attribut "align" pour les aligner sur une ligne centrale. On spécifie aussi ici un attribut "id" pour certains composants de manière à pouvoir ensuite les contrôler grâce à cet ''id''. Vous pouvez aussi facilement afficher une image sur le bouton en spécifiant le chemin de celle-ci dans l'attribut "image". |
| Line 293: | Line 293: | ||
You can see the complete zul file through the link in the References section. <ref> [https://code.google.com/p/zkbooks/source/browse/trunk/gettingStarted/getZkUp/WebContent/search.zul search.zul] </ref> | You can see the complete zul file through the link in the References section. <ref> [https://code.google.com/p/zkbooks/source/browse/trunk/gettingStarted/getZkUp/WebContent/search.zul search.zul] </ref> | ||
| − | |||
= Automatic UI Controlling = | = Automatic UI Controlling = | ||
Revision as of 09:42, 14 April 2014
Introduction
Ce tutoriel est à destination des développeurs d'applications qui ont de l'expérience dans l'écriture de programmes Java. Vous apprendrez des concepts basiques à travers la construction d'une application web moderne avec ZK. L'application que nous allons construire consiste simplement en un catalogue de voitures. Nous allons utiliser l'approche selon le design pattern Model-View-ViewModel (MVVM). Dans cette dernière, ZK peut automatiquement contrôler les composants pour vous et l'UI est clairement séparée de son contrôleur. De plus, vous pouvez aussi choisir l'approche MVC qui est présentée dans un autre tutoriel [1].
Nous mettons également à disposition le code source complet dans un fichier zip qui contient le projet Eclipse ici Import and Run Example Application.
Objectif du tutoriel
Notre application consiste simplement en un catalogue de voitures. Cette application a deux fonctions:
- Chercher des voitures.
- Entrez un mot-clé dans le champ d'entrée, cliquez Search et les résultats seront affichés dans la liste en dessous.
- Voir les détails.
- Cliquez sur un élément de la liste, la zone sous la liste de voiture affichera alors les détails de la voiture sélectionnée dont le modèle, le prix, une description et un aperçu.

Échauffement
Cette section vous guide pour mettre en place un projet et utiliser ZK dans Eclipse. Si vous voulez d'abord savoir comment construire l'application avec ZK, démarrez d'abord depuis Declaring Domain Class. Pour commencer, nous allons voir comment préparer un environnement pour construire une application web ZK à savoir configurer l'IDE, installer ZK et lancer l'application dans un serveur.
Configurer Eclipse
Dans ce tutoriel, Eclipse IDE 3.7 (indigo) pour Java EE developer ![]() est utilisé pour montrer la construction de l'application 'catalogue de voitures'. (Télécharger Eclipse ici, extraire le fichier zip téléchargé dans un dossier et exécuter eclipse.exe pour lancer Eclipse.)
est utilisé pour montrer la construction de l'application 'catalogue de voitures'. (Télécharger Eclipse ici, extraire le fichier zip téléchargé dans un dossier et exécuter eclipse.exe pour lancer Eclipse.)
Pour pouvoir éditer les pages ZK UI dans Eclipse, ajoutez "zul" (nom des extensions des fichiers ZK UI) comme type de contenu de format XML en suivant les étapes suivantes:
- Sélectionnez Window \ Preferences pour ouvrir la fenêtre Preferences
- À gauche, sélectionnez General --> Content Types. À droite, ouvrez le nœud Text dans la boîte "Content types" box et sélectionnez XML
- Cliquez sur Add et ajoutez le type de contenu que vous souhaitez ajouter à savoir *.zul dans ce cas-ci, ensuite cliquez sur OK

Une fois ceci terminé, Eclipse va utiliser l'éditeur XML pour ouvrir votre fichier zul.
Installer ZK dans un Web Project
Télécharger ZK
Téléchargez d'abord le ZK CE (le nom du fichier sera du genre zk-bin-[version].zip) et extrayez le dans un dossier.
Créer un Project
Pour construire une application web, il faut d'abord créer un "Dynamic Web Project" dans Eclipse:
- Sélectionnez File \ New \ Dynamic Web Project
- Entrez tutorial comme nom du Project et laissez le reste par défaut.

- Vous pouvez laisser "Target runtime" à "none".
- Notez que l'on met la valeur de Dynamic web module version à 3.0 parce-que nous voulons utiliser Servlet 3.0 pour supprimer la configuration de l'application.
Installer ZK JAR
Pour utiliser ZK dans votre projet, vous devez copier les fichiers ZK JAR dans le dossier des librairies de votre projet.
Copiez les fichiers JAR depuis le répertoire suivant vers WebContent\WEB-INF\lib:
- {YOUR_ZK_UNZIP_FOLDER}\dist\lib
- {YOUR_ZK_UNZIP_FOLDER}\dist\lib\ext
![]() Si vous préférez utiliser un serveur d'applications qui supporte des spécifications Servlet (< 3.0)' plus anciennes ou JDK 1.5, vous devez ajouter des configurations supplémentaires dans web.xml. Merci de vous référer au Guide d'Installation ZK. [2]
Si vous préférez utiliser un serveur d'applications qui supporte des spécifications Servlet (< 3.0)' plus anciennes ou JDK 1.5, vous devez ajouter des configurations supplémentaires dans web.xml. Merci de vous référer au Guide d'Installation ZK. [2]
Créer une page simple
Après l'installation, vous pouvez créer un zul simple pour vérifier que l'installation fonctionne correctement.
Dans Eclipse,
- Sélectionnez File \ New \ File (or File \ New \ Other \ File ) pour ajouter un nouveau fichier, hello.zul dans WebContent.
- Cliquez sur Source pour modifier la source.
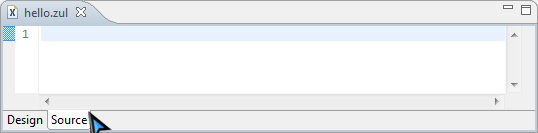 creating a zul-file in eclipse's xml editor
- Copiez et collez l'extrait de code suivant dans hello.zul et enregistrez.

hello.zul
 <window title="My First ZK Application" border="normal">
 	Hello World!
 </window>
Maintenant, dans la vue Project Explorer, votre projet devrait ressembler à ceci:

Si vous ne trouvez pas la vue Project Explorer, sélectionnez le menu Window \ Show View \ Project Explorer pour l'ouvrir.
Lancer une Application
Avant de lancer une application web, nous devons créer un serveur dans Eclipse. Sélectionnez Window \ Preferences pour ouvrir la fenêtre Preferences et sélectionnez Server \ Runtime Environments sur la gauche. Cliquez sur Add pour ajouter un environnement d'exécution de serveur.

Sélectionnez Apache \ Tomcat v7.0 Server vu qu'il supporte Servlet 3.0 et cochez Create a new local server, cliquez ensuite sur Next.
![]() Si vous utilisez JDK 1.5, vous pouvez utiliser Tomcat v6.0 mais il faudra faire davantage de configurations dans web.xml. Merci de voir le ZK Installation Guide dans References .
Si vous utilisez JDK 1.5, vous pouvez utiliser Tomcat v6.0 mais il faudra faire davantage de configurations dans web.xml. Merci de voir le ZK Installation Guide dans References .

Si vous avez précédemment installé Tomcat 7, fournissez simplement le chemin du répertoire. Si vous ne l'avez pas, suivez les étapes suivantes:
- Cliquez sur Download and Install et choisissez un répertoire.
- Notez que le chemin d'installation ne peut contenir aucun caractère non-ASCII.
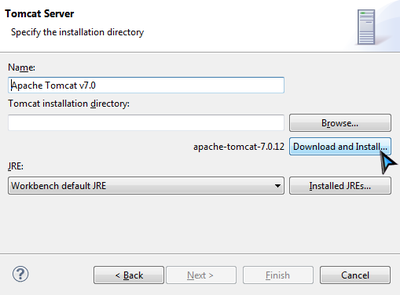
- Acceptez la licence et attendez.
- Eclipse affichera un message d'erreur avant que l'installation ne s'achève, ignorez le.

- Patientez et n'interrompez pas l'installation pour être certain qu'elle s'effectue correctement.

- Eclipse va télécharger et installer Tomcat dans le dossier que vous avez spécifié.
- Lorsque l'installation est finie, cliquez sur Finish


Vous devriez maintenant voir une nouvelle entrée dans Server runtime environments.

Faites un clique droit sur hello.zul et sélectionnez Run As \ Run on Server pour faire tourner ce zul sur un serveur d'applications.

Choisissez un Tomcat 7. Vous pouvez aussi cocher l'option Always use this server when running this project pour ne pas devoir choisir un serveur à chaque fois que vous lancerez l'application par la suite. Cliquez sur Finish et attendez que le serveur démarre.

Une fois le serveur démarré, Eclipse va ouvrir un browser et vous connecter automatiquement à http://localhost:8080/tutorial/hello.zul . Si vous voyez l'image suivante, alors votre projet est prêt pour utiliser ZK.

Vous pouvez revenir ici et suivre à nouveau ces étapes pour lancer votre application au cours de ce tutoriel
Import and Run Example Application
We have prepared an Eclipse project zip file that contains the complete source code, you can download and import it to your Eclipse without having to start from scratch.
To use example application, follow the steps below:
- Download example application project zip file.
- In Eclipse, select File \ Import \ General \ Existing Projects into Workspace, choose Select archive file to import example application zip file as a project into your Eclipse.
- Then follow the instructions from Run an Application to run it.
Déclaration des classes du domaine
Ce qui suit est l'objet du domaine qui représente une voiture.
public class Car {
	private Integer id;
	private String model;
	private String make;
	private String preview;
	private String description;
	private Integer price;
	//omit getter and setter for brevity
}
- Merci de vous référer à la section References pour voir le code complet. [3]
On définit ensuite une classe de service pour effectuer la logique business (chercher des voitures) tel que montré ci-dessous:
public interface CarService {

	/**
	 * Retrieve all cars in the catalog.
	 * @return all cars
	 */
	public List<Car> findAll();

	/**
	 * search cars according to keyword in  model and make.
	 * @param keyword for search
	 * @return list of car that match the keyword
	 */
	public List<Car> search(String keyword);
}
Dans cet exemple, nous avons défini une classe - CarServeImpl qui implémente l'interface ci-dessus. Par soucis de simplicité, elle utilise une liste objet statique comme modèle de données. Vous pouvez la réécrire de sorte qu'elle se connecte à une base de données dans une application réelle. Les détails de l'implémentation ne sont pas l'objet de cet article, merci de vous référer à la section References.[4]
Construire l'interface utilisateur
Le design de l'UI est un bon début pour construire une application vu qu'il vous aide à définir l'étendue de votre application. ZK fournit des centaines de composants UI prêts à l'emploi de sorte que les développeurs peuvent rapidement construire l'interface utilisateur de leur choix en combinant et en mélangeant ces composants sans avoir à les créer.
Dans ZK, vous pouvez utiliser ZK User Interface Markup Language (ZUML) [5], un langage formaté XML, pour décrire les UI. Suivant la convention ZK, les fichiers décrivant les UI avec ZUML utilisent comme suffixe .zul. Dans les fichiers zul, un composant peut être représenté comme un élément XML (tag) et vous pouvez configurer pour chaque composant son style, son comportement et sa fonction via les attributs XML de cet élément.[6]
Dans cet exemple, nous voulons d'abord concevoir une fenêtre avec un titre spécifique et un bord normal qui sera la fenêtre de notre application.
Extrait de search.zul
	<window title="Search" width="600px" border="normal">
		<!-- put child components inside a tag's body -->
	</window>
Vu que window est le composant 'englobant' principal, il est appelé root component. Window est un container souvent utilisé parce-que c'est un élément d'affichage de base d'une application de type bureau et qui peut en même temps contenir d'autres composants. Tous les autres composants inclus dans window sont appelés child components et doivent être placés dans le body de la fenêtre. Nous mettons un texte dans la barre de titre de window grâce à l'attribut "title" et nous faisons en sorte que window s'affiche avec un bord normal grâce à l'attribut "border". Pour l'attribut "width", utilisez une syntaxe de type CSS comme "800px" ou "60%".
De base, l'UI de notre application est divisée en 3 zones à l'intérieur de window qui sont, de haut en bas, la fonction de recherche, la liste des voitures et les détails de la voiture.

Zone de recherche:
Les composants ZK sont comme des blocs à construire, vous pouvez combiner et mélanger les composants existants pour construire l'UI de votre choix. Pour permettre aux utilisateurs d'effectuer des recherches, il faut un texte incitant les utilisateurs à entrer une valeur, un endroit pour qu'ils tapent effectivement cette valeur-clé et un bouton qui va déclencher la recherche. Nous pouvons utiliser dans ce but les composants ZK suivants:
Extrait de search.zul
	 	<hbox align="center">
	 		Keyword:
	 		<textbox id="keywordBox" />
	 		<button id="searchButton" label="Search" image="/img/search.png" />
	 	</hbox>
hbox est un composant de layout qui organise ses enfants de manière horizontale et vous avez donc deviné que le h signifie horizontal. Vu que ces composants enfants ont des hauteurs différentes, nous mettons la valeur "center" à l'attribut "align" pour les aligner sur une ligne centrale. On spécifie aussi ici un attribut "id" pour certains composants de manière à pouvoir ensuite les contrôler grâce à cet id. Vous pouvez aussi facilement afficher une image sur le bouton en spécifiant le chemin de celle-ci dans l'attribut "image".
Car List Area. ZK provides several components to display a collection of data such as listbox, grid, and tree. In this example, we have chosen to use a listbox to display a list of cars with 3 columns: Model, Make and Price. We set the "height" attribute so the number of rows visible is limited with respect to the height specified; you can drag scroll-bar to see the rest of rows. The "emptyMessage" attribute is used to show a message when listbox contains no items. The listbox is a container component, and you can add listhead to define a column. The listitem is used to display data, and the number of listcell in one listitem should equal to the number of listheader. Here we use listcell with static label to demonstrate structure of a listitem, and we'll talk about how to create listitem dynamically with respect to each data object in the next chapter.
Extracted from search.zul
	 	<listbox id="carListbox" height="160px" emptyMessage="No car found in the result">
			<listhead>
				<listheader label="Model" />
				<listheader label="Make" />
				<listheader label="Price" width="20%"/>
			</listhead>
			<listitem>
				<listcell label="car model"></listcell>
				<listcell label="make"></listcell>
				<listcell>$<label value="price" /></listcell>
			</listitem>
		</listbox>
Car Details Area. Like the hbox, vbox is also a layout component which arranges its child component in vertical order. By combing these 2 layout components, we can present more information on a screen. The "style" attribute allows you to customize component's style with CSS syntax.
Extracted from search.zul
		<hbox style="margin-top:20px">
			<image id="previewImage" width="250px" />
			<vbox>
				<label id="modelLabel" />
				<label id="makeLabel" />
				<label id="priceLabel" />
				<label id="descriptionLabel"/>
			</vbox>
		</hbox>
You can see the complete zul file through the link in the References section. [7]
Automatic UI Controlling
The approach we introduce here to control user interaction is to let ZK control UI components for you. This approach is classified to Model-View-ViewModel (MVVM) design pattern. [8] This pattern divides an application into three parts.
The Model consists of application data and business rules. CarService and other classes used by it represent this part in our example application.
The View means user interface. The zul page which contains ZK components represents this part. A user's interaction with components triggers events to be sent to controllers.
The ViewModel is responsible for exposing data from the Model to the View and providing required action requested from the View. The ViewModel is type of View abstraction which contains a View's state and behavior. But ViewModel should contain no reference to UI components. ZK framework handles communication and state synchronization between View and ViewModel.
Under this approach, we just prepare a ViewModel class with proper setter, getter and behavior methods, then assign data binding expression to a component's attributes in a ZUL. There is a binder in ZK which will synchronize data between ViewModel and components and handle events automatically according to binding expressions. We don't need to control components by ourselves.
Here we use search function to explain how MVVM works in ZK. Assume that a user click "Search" button then listbox updates its content. The flow is as follows:

- A user clicks "Search" button and a corresponding event is sent.
- ZK's binder invokes the corresponding command method in the ViewModel.
- The method accesses data from Model and updates some ViewModel's properties.
- ZK's binder reloads changed properties from the ViewModel to update component's states.
Abstracting the View
ViewModel is an abstraction of View. Therefore when we design a ViewModel, we should analysis UI's functions for what state it contains and what behavior it has.
The state:
- keyword from user input
- car list of search result
- selected car
The behavior:
- search
According to above analysis, the ViewModel should have 3 variables for above states and one method for the behavior. In ZK, creating a ViewModel is like creating a POJO, and it exposes its states like JavaBean's properties through setter and getter methods. The search method implements search logic with service class and updates the property "carList".
SearchViewModel.java
package tutorial;

import java.util.List;
import org.zkoss.bind.annotation.*;

public class SearchViewModel {

	private String keyword;
	private List<Car> carList;
	private Car selectedCar;

	//omit getter and setter

	public void search(){
		carList = carService.search(keyword);
	}
}
Annotation
In ZK MVVM, any behavior which can be requested by a View is a command in a ViewModel. We can bind a component's event to the command and ZK will invoke the method when bound event is triggered. In order to let ZK know which behavior (method) can be requested, you should apply an annotation @Command on a method. We mark search() as a "command" with default command name, search, which is the same as method name. The command name is used in data binding expression we'll talk about in next section.
In search(), we change a ViewModel's property: carList. Thus, we should tell ZK this change with @NotifyChange so that ZK can reload the changed property for us after it invokes this method.
For "search" command, it looks like:
SearchViewModel.java
package tutorial;

import java.util.List;
import org.zkoss.bind.annotation.*;

public class SearchViewModel {

	//omit other codes

	@Command
	@NotifyChange("carList")
	public void search(){
		carList = carService.search(keyword);
	}
}
For complete source code, please refer to References section. [9]
Binding UI to ViewModel
Under MVVM, we build our UI as same as we would with the MVC approach, then we specify relationship between a ZUL and a ViewModel by writing data binding expression in component's attribute, and let ZK handle components for us.
To bind a component to a ViewModel, we should apply a composer called org.zkoss.bind.BindComposer. This composer processes data binding expressions and initializes the ViewModel class. We then bind this component to a ViewModel by setting its viewModel attribute with following syntax:
@id('ID') @init('FULL.QUALIFIED.CLASSNAME')
- @id() is used to set ViewModel's id to whatever we want like a variable name. We will use this id to reference ViewModel's properties (e.g. vm.carList) in a data binding expression.
- We should provide full-qualified class name for @init() to initialize the ViewModel object.
Extracted from searchMvvm.zul
	<window title="Search" width="600px" border="normal"
		apply="org.zkoss.bind.BindComposer" viewModel="@id('vm') @init('tutorial.SearchViewModel')">
	<!-- omit other tags-->
	</window>
After binding the ViewModel to the component, all its child components can access the same ViewModel and its properties.
We can bind View to both ViewModel's properties and behavior with data binding expression. Let's see how to use data binding to achieve search function.
Since we have declared variables in ViewModel class for component's states in previous section, we can bind component's attributes to them. After binding a component's attribute to ViewModel, ZK will synchronize data between attribute's value and a ViewModel's property for us automatically. We can specify which attribute is bound to which property by writing data binding expression as a component attribute's value with syntax:
@bind(vm.aProperty)
- Remember that vm is the id we have given it in @id() previously and now we use it to reference ViewModel object.
There are 2 states which relate to search function to be stored in the ViewModel upon previous analysis. First, we want to store value of textbox in ViewModel's keyword. We can then bind "value" of textbox to vm.keyword with @bind(vm.keyword). Second, we want to store the data model of a listbox in ViewModel's carList, so we should bind listbox's "model" to vm.carList.
Extracted from searchMvvm.zul
		<hbox>
			Keyword:
			<textbox value="@bind(vm.keyword)" />
			<button label="Search" image="/img/search.png"/>
		</hbox>
		<listbox height="160px" model="@bind(vm.carList)" emptyMessage="No car found in the result">
		<!-- omit other tags -->
We can only bind a component's event attribute (e.g. onClick) to ViewModel's behavior. After we bind an event to a ViewModel, each time a user triggers the event, ZK finds the bound command method and invokes it. In order to handle clicking on "Search" button, we have to bind button's onClick attribute to a command method with following syntax:
@command('COMMAND_NAME')
- We should look for command name specified in our ViewModel's command method.
Extracted from searchMvvm.zul
		<hbox>
			Keyword:
			<textbox value="@bind(vm.keyword)" />
			<button label="Search" image="/img/search.png" onClick="@command('search')" />
		</hbox>
		<listbox height="160px" model="@bind(vm.carList)" emptyMessage="No car found in the result">
		<!-- omit other tags -->
After binding this "onClick" event, when a user clicks "Search" button, ZK will invoke search() and reload the property "carList" which is specified in @NotifyChange.
Displaying Data Collection
The way to display a collection of data with data binding is very similar to the way in MVC approach. we will use a special tag, <template> [10], to control the rendering of each item. The only difference is we should use data binding expression instead of EL.
Steps to use <template> :
- Use <template> to enclose components that we want to create iteratively.
- Set template's "name" attribute to "model". [11]
- Use implicit variable, each, to assign domain object's properties to component's attributes.
Extracted from searchMvvm.zul
		<listbox height="160px" model="@bind(vm.carList)" emptyMessage="No car found in the result">
			<listhead>
				<listheader label="Model" />
				<listheader label="Make" />
				<listheader label="Price" width="20%"/>
			</listhead>
			<template name="model">
				<listitem>
					<listcell label="@bind(each.model)"></listcell>
					<listcell label="@bind(each.make)"></listcell>
					<listcell>$<label value="@bind(each.price)" />
					</listcell>
				</listitem>
			</template>
		</listbox>
Implementing View Details Functionality
The steps to implement the view details functionality are similar to previous sections.
- We bind attribute selectedItem of listbox to the property vm.selectedCar to save selected domain object.
- Because we want to show selected car's details, we bind value of label and src of image to selected car's properties which can be access by chaining dot notation like vm.selectedCar.price.
- Each time a user selects a listitem, ZK saves selected car to the ViewModel. Then ZK reloads selectedCar's properties to those bound attributes.
		<listbox height="160px" model="@bind(vm.carList)" emptyMessage="No car found in the result"
		selectedItem="@bind(vm.selectedCar)">
		<!-- omit child components -->
		</listbox>
		<hbox style="margin-top:20px">
			<image width="250px" src="@bind(vm.selectedCar.preview)" />
			<vbox>
				<label value="@bind(vm.selectedCar.model)" />
				<label value="@bind(vm.selectedCar.make)" />
				<label value="@bind(vm.selectedCar.price)" />
				<label value="@bind(vm.selectedCar.description)" />
			</vbox>
		</hbox>
You can view complete zul in References. [12]
Approach Comparison
The interaction picture at left side is MVC, and the one at right side is MVVM. The main differences are that Controller changes to ViewModel and there is a binder to synchronize data instead of a Controller in MVVM .

MVC
MVVM
Both approaches can achieve many things in common, but there are still some differences between them. Each of two approaches has its strength. Building an application with MVC approach is more intuitive, because you directly control what you see. Its strength is that you have total control of components, so that you can create child components dynamically, control custom components, or do anything a component can do.
In MVVM, because ViewModel is loosely-coupled with View (it has no reference to components), one ViewModel may associate with multiple Views without modification. UI designers and programmers may work in parallel. If data and behavior do not change, a View's change doesn't cause ViewModel to be modified. In addition, as ViewModel is a POJO, it is easy to perform unit test on it without any special environment. That means ViewModel has better reusability, testabiliby, and better resistance against View change.
To summarize, a comparison table is illustrated below:
| Coupling with View | Loose with layout | Loose |
|---|---|---|
| Coupling with Component | Tight | Loose |
| Coding in View | Component ID | Data binding expression |
| Controller Implementation | Extends ZK's composer | a POJO |
| UI Data Access | Direct access | Automatic |
| Backend Data Access | Direct access | Direct access |
| UI Updating | Manipulate components | Automatic(@NotifyChange) |
| Component Controlling Granularity | Fine-grained | Normal |
| Performance | High | Normal |
References
- ↑ ZK Getting Started/Get ZK Up and Running with MVC
- ↑ ZK Installation Guide \ Create and Run Your First ZK Application Manually
- ↑ Car.java
- ↑ CarService.java CarServiceImpl.java
- ↑ ZUML Reference
- ↑ ZK Component Reference
- ↑ search.zul
- ↑ MVVM in Developer's Reference
- ↑ SearchViewModel.java
- ↑ ZK Developer's Reference/MVC/View/Template
- ↑ ZK Developer's Reference/MVC/View/Template/Listbox Template
- ↑ searchMvvm.zul