Get ZK Up and Running with MVVM fr"
Tmillsclare (talk | contribs) m (Created page with "= Introduction = <!-- target readers article purpose --> This tutorial is intended for software developers who have experience in writing Java programs. We will guide you thro...") |
Tmillsclare (talk | contribs) m |
||
| Line 16: | Line 16: | ||
| − | {{ | + | = Tutorial Objective = |
| + | Our target application is a simple car catalog application. This application has two functions: | ||
| + | # Search cars. | ||
| + | #: Enter a keyword in the input field, click <b>Search</b> and search results will be displayed in the car list below. | ||
| + | # View details. | ||
| + | #: Click an item from the car list, the area below the car list will show the selected car's details including model, price, description, and preview. | ||
| + | |||
| + | |||
| + | [[File:tutorial-searchexample.png| 400px | center]] | ||
| + | |||
| + | |||
| + | |||
| + | = Warm Up = | ||
| + | |||
| + | This section guides you through how to setup a project and use ZK in Eclipse. If you want to know how to build the application with ZK first, please skip it and start from [[#Declaring Domain Class| Declaring Domain Class]]. To begin, we will start with how to prepare an environment to build a ZK web application in including setting the IDE, installing ZK, and running an application in a server. | ||
| + | |||
| + | |||
| + | ==Setup Eclipse == | ||
| + | |||
| + | In this tutorial, Eclipse IDE 3.7 (indigo) for Java EE developer [[File:Eclipse-javaee.png]] is used to demonstrate the building of the car catalog application. ([http://www.eclipse.org/downloads/packages/release/indigo/sr2 Download Eclipse] here, extract the downloaded zip file to a folder and execute eclipse.exe to run Eclipse.) | ||
| + | |||
| + | In order to edit ZK UI pages in Eclipse, add "zul" (ZK UI page's file extension name) as a content type of XML format following these steps below: | ||
| + | |||
| + | # Select '''Window \ Preferences''' to open Preferences window | ||
| + | # On the left, select '''General --> Content Types'''. On right, expand '''Text''' node in "Content types" box and select '''XML''' | ||
| + | # Click '''Add''' and type in the content type you wish to add which is '''*.zul''' in this case, then click '''OK''' | ||
| + | |||
| + | [[File:Tutorial-add-contenttype.png| 400px | center]] | ||
| + | |||
| + | |||
| + | After this has been done, Eclipse will use XML editor to open your zul file. | ||
| + | |||
| + | == Install ZK in a Web Project== | ||
| + | |||
| + | '''Download ZK''' | ||
| + | |||
| + | [http://www.zkoss.org/download/zk Download the ZK CE first] (file name would look like ''zk-bin-[version].zip'') and extract it to a folder. | ||
| + | |||
| + | |||
| + | '''Create a Project''' | ||
| + | |||
| + | To build a web application, first, create a "Dynamic Web Project" in Eclipse: | ||
| + | # Select '''File \ New \ Dynamic Web Project''' | ||
| + | # Enter '''tutorial''' in Project name and keep everything else default. | ||
| + | |||
| + | [[File:Tutorial-newproject.png | 400px | center]] | ||
| + | |||
| + | * You can leave "Target runtime" as "none". | ||
| + | * Notice that we set '''Dynamic web module version''' to 3.0 because we want to use Servlet 3.0 to eliminate application configuration. | ||
| + | |||
| + | |||
| + | '''Install ZK JAR''' | ||
| + | |||
| + | To use ZK in your project, you have to copy ZK JAR files into your project's library folder. | ||
| + | |||
| + | Copy the JAR files from the following directory to '''WebContent\WEB-INF\lib''': | ||
| + | * {YOUR_ZK_UNZIP_FOLDER}\dist\lib | ||
| + | * {YOUR_ZK_UNZIP_FOLDER}\dist\lib\ext | ||
| + | |||
| + | |||
| + | <div style="-webkit-border-radius:10px;-moz-border-radius:10px;border-radius:10px;-moz-background-clip:padding;-webkit-background-clip:padding-box;background-clip:padding-box;color:#c06330;padding:15px 40px;background:#fed no-repeat 13px 13px;margin-bottom:10px | ||
| + | "> | ||
| + | [[File:Icon_info.png ]] If you prefer to use an application server that supports '''older (< 3.0)''' Servlet specification or '''JDK 1.5''', you need to add more configuration on web.xml. Please refer to ZK Installation Guide. <ref> [[ZK Installation Guide/Quick Start/Create and Run Your First ZK Application Manually| ZK Installation Guide \ Create and Run Your First ZK Application Manually]] </ref> | ||
| + | </div> | ||
| + | |||
| + | |||
| + | '''Create a Simple Page ''' | ||
| + | |||
| + | After installation, you can create a simple zul to verify if the installation has been successful or not. | ||
| + | |||
| + | In Eclipse, | ||
| + | # Select '''File \ New \ File''' (or '''File \ New \ Other \ File''' ) to add a new file, '''hello.zul''', under '''WebContent'''. | ||
| + | # Click '''Source''' tab to modify source. | ||
| + | #: [[File:Tutorial-xmleditor.png| 400px | frame| center|c|creating a zul-file in eclipse's xml editor]] | ||
| + | # Copy and paste the following sample code into hello.zul and save. | ||
| + | |||
| + | '''hello.zul''' | ||
| + | <source lang="xml"> | ||
| + | <window title="My First ZK Application" border="normal"> | ||
| + | Hello World! | ||
| + | </window> | ||
| + | </source> | ||
| + | |||
| + | |||
| + | |||
| + | |||
| + | Now, in '''Project Explorer''' view your project would look something like: | ||
| + | |||
| + | [[File:Tutorial-project-structure.png | 200px | center]] | ||
| + | |||
| + | If you cannot find '''Project Explorer''' view, select menu '''Window \ Show View \ Project Explorer''' to open it. | ||
| + | |||
| + | == Run an Application == | ||
| + | <!-- | ||
| + | 將 new server 及 run on the server 分成兩個步驟,後面的章節可隨時依照run on the server的步驟執行範例程式 | ||
| + | --> | ||
| + | |||
| + | |||
| + | Before running a web application, we must create a server in Eclipse. Select '''Window \ Preferences''' to open Preferences window and select '''Server \ Runtime Environments''' from the left. Click '''Add''' to add a server runtime environment. | ||
| + | |||
| + | [[File:Tutorial-preference-server.png | 400px | center]] | ||
| + | |||
| + | |||
| + | Select '''Apache \ Tomcat v7.0 Server''' as it supports Servlet 3.0 and tick '''Create a new local server''', then click '''Next'''. | ||
| + | |||
| + | <div style="-webkit-border-radius:10px;-moz-border-radius:10px;border-radius:10px;-moz-background-clip:padding;-webkit-background-clip:padding-box;background-clip:padding-box;color:#c06330;padding:15px 40px;background:#fed no-repeat 13px 13px;margin-bottom:10px | ||
| + | "> | ||
| + | [[File:Icon_info.png ]] If you use JDK 1.5, you could choose Tomcat v6.0 but you will need more configuration on web.xml. Please refer to ZK Installation Guide in [[#References| References]] . | ||
| + | </div> | ||
| + | |||
| + | [[File:Tutorial-newserver.png | 400px | center]] | ||
| + | |||
| + | |||
| + | |||
| + | If you have installed Tomcat 7 previously, simply provide the directory path. If you haven't, proceed with the following steps: | ||
| + | # Click '''Download and Install''' and choose a folder. | ||
| + | #: '''Notice that the installation path must not contain non-ASCII characters.''' | ||
| + | #: [[File:Tutorial-downloadinstall.png | 400px | center]] | ||
| + | # Accept the license agreement and wait. | ||
| + | #: '''Eclipse will show an error message before installation completes, please ignore this message.''' | ||
| + | #: [[File:Tutorial-installing-unknown.png | 400px | center]] | ||
| + | #: '''Please wait and do not interrupt the installation before it completes to ensure that the installation has been done properly.''' | ||
| + | #: [[File:Tutorial-installing-progress.png | center]] | ||
| + | #: Eclipse will download and install Tomcat into the folder you have specified. | ||
| + | # After the installation has been completed, click '''Finish''' | ||
| + | |||
| + | |||
| + | Now you should be able to see a new entry in '''Server runtime environments'''. | ||
| + | |||
| + | [[File:Tutorial-server-complete.png | 500px | center]] | ||
| + | |||
| + | |||
| + | |||
| + | Right click on hello.zul and select '''Run As \ Run on Server''' to run this zul on an application server. | ||
| + | |||
| + | [[File:Tutorial-runonserver.png | 500px | center]] | ||
| + | |||
| + | |||
| + | |||
| + | Choose an existing Tomcat 7. Yon can also tick '''Always use this server when running this project''' option to avoid choosing a server each time you run the application in the future. Click '''Finish''' and wait for the server to start running. | ||
| + | |||
| + | [[File:Tutorial-choose-server.png | 400px | center]] | ||
| + | |||
| + | |||
| + | |||
| + | After the server starts running, Eclipse will open a browser and connect to http://localhost:8080/tutorial/hello.zul automatically . If you can see the following image, then your project is ready to use ZK. | ||
| + | |||
| + | [[File:Tutorial-hello.png | 400px | center]] | ||
| + | |||
| + | You can come back and follow these steps to run your application during this tutorial | ||
| + | |||
| + | == Import and Run Example Application == | ||
| + | |||
| + | We have prepared an Eclipse project zip file that contains the complete source code, you can download and import it to your Eclipse without having to start from scratch. | ||
| + | |||
| + | To use example application, follow the steps below: | ||
| + | # [http://sourceforge.net/projects/zkbook/files/GettingStarted/getzkup-20131127.zip/download Download example application project zip file]. | ||
| + | # In Eclipse, select '''File \ Import \ General \ Existing Projects into Workspace''', choose '''Select archive file''' to import example application zip file as a project into your Eclipse. | ||
| + | # Then follow the instructions from [[#Run an Application |Run an Application]] to run it. | ||
| + | |||
| + | <!-- | ||
| + | We describe domain objects here, because this section is independent from MVC and MVVM sections and domain part is unchanged for these 2 design patterns. | ||
| + | --> | ||
| + | |||
| + | = Declaring Domain Class = | ||
| + | |||
| + | The following is the domain object that represents a car. | ||
| + | |||
| + | <source lang="java"> | ||
| + | |||
| + | public class Car { | ||
| + | private Integer id; | ||
| + | private String model; | ||
| + | private String make; | ||
| + | private String preview; | ||
| + | private String description; | ||
| + | private Integer price; | ||
| + | //omit getter and setter for brevity | ||
| + | } | ||
| + | </source> | ||
| + | * Please refer to References section to see the complete code. <ref> [https://code.google.com/p/zkbooks/source/browse/trunk/gettingStarted/getZkUp/src/tutorial/Car.java Car.java] </ref> | ||
| + | |||
| + | We then define a service class to perform the business logic (search cars) shown below: | ||
| + | |||
| + | <source lang="java"> | ||
| + | public interface CarService { | ||
| + | |||
| + | /** | ||
| + | * Retrieve all cars in the catalog. | ||
| + | * @return all cars | ||
| + | */ | ||
| + | public List<Car> findAll(); | ||
| + | |||
| + | /** | ||
| + | * search cars according to keyword in model and make. | ||
| + | * @param keyword for search | ||
| + | * @return list of car that match the keyword | ||
| + | */ | ||
| + | public List<Car> search(String keyword); | ||
| + | } | ||
| + | </source> | ||
| + | |||
| + | In this example, we have defined a class - <tt>CarServeImpl</tt> that implements the above interface. For simplicity, it uses a static list object as the data model. You can rewrite it so that it connects to a database in a real application. Implementation details are not in the scope of this article, please refer to References section.<ref> [https://code.google.com/p/zkbooks/source/browse/trunk/gettingStarted/getZkUp/src/tutorial/CarService.java CarService.java] [https://code.google.com/p/zkbooks/source/browse/trunk/gettingStarted/getZkUp/src/tutorial/CarServiceImpl.java CarServiceImpl.java] </ref> | ||
| + | |||
| + | =Building the User Interface = | ||
| + | |||
| + | UI Design is a good start to building an application as it helps you define the scope of your application. ZK provides hundreds of readily-made UI components so developers can rapidly build their desired user interface by combining and mix matching these components without having to create them from scratch. | ||
| + | |||
| + | In ZK, you can use ZK User Interface Markup Language (ZUML) <ref> [[ZUML Reference|ZUML Reference]] </ref>, an XML-formatted language, to describe UI. By ZK's convention, the files to describe user interface with ZUML uses '''.zul''' as the name suffix. In zul files, one component can be represented as an XML element (tag) and you can configure each component's style, behavior, and function by setting XML element's attributes.<ref> [[ZK Component Reference|ZK Component Reference]] </ref> | ||
| + | |||
| + | In the case of this example application, first of all, we want to design a ''window'' with specified title and normal border as our application's frame. | ||
| + | |||
| + | |||
| + | '''Extracted from search.zul''' | ||
| + | <source lang="xml"> | ||
| + | |||
| + | <window title="Search" width="600px" border="normal"> | ||
| + | <!-- put child components inside a tag's body --> | ||
| + | </window> | ||
| + | </source> | ||
| + | |||
| + | As ''window'' is the outermost component, it is called the ''root component''. ''Window'' is a commonly used container because it is a basic display element of a desktop-like application while it can also enclose other components. All other components inside ''window'' are called ''child components'' and should be put in window tag's body. We set ''window'''s title bar text with "title" attribute and make ''window'' display a normal border with "border" attribute. For "width" attribute, use CSS like syntax such as "800px" or "60%". | ||
| + | |||
| + | |||
| + | Basically, our example application's user interface is divided into 3 areas within the ''window'', they are (from top to bottom) search function, car list, and car details. | ||
| + | |||
| + | [[File:Tutorial-ui-3areas.png | 400px |center]] | ||
| + | |||
| + | |||
| + | '''Search Area:''' | ||
| + | ZK components are like building blocks, you can combine and mix match existing components to construct your desired UI. To allow users to search, we need a text to prompt users for input, a place to enter keywords, and a button for triggering the search. We can use the following ZK components to fulfill this requirement: | ||
| + | |||
| + | '''Extracted from search.zul''' | ||
| + | <source lang="xml"> | ||
| + | |||
| + | <hbox align="center"> | ||
| + | Keyword: | ||
| + | <textbox id="keywordBox" /> | ||
| + | <button id="searchButton" label="Search" image="/img/search.png" /> | ||
| + | </hbox> | ||
| + | |||
| + | </source> | ||
| + | |||
| + | <tt>hbox</tt> is a layout component that arranges its child components horizontally and you can probably guess by now that the '''h''' represents ''horizontal''. As these child components have different heights, we set the "align" attribute to "center" so they are aligned neatly along their center line. Here we also specify an "id" attribute for some components which allows you to control them by referencing their ''id''. You can also easily create an image button by specifying the path for the "image" attribute. | ||
| + | |||
| + | |||
| + | '''Car List Area.''' ZK provides several components to display a collection of data such as ''listbox'', ''grid'', and ''tree''. In this example, we have chosen to use a ''listbox'' to display a list of cars with 3 columns: Model, Make and Price. We set the "height" attribute so the number of rows visible is limited with respect to the height specified; you can drag scroll-bar to see the rest of rows. The "emptyMessage" attribute is used to show a message when ''listbox'' contains no items. The ''listbox'' is a container component, and you can add ''listhead'' to define a column. The ''listitem'' is used to display data, and the number of ''listcell'' in one ''listitem'' should equal to the number of ''listheader''. Here we use ''listcell'' with static label to demonstrate structure of a ''listitem'', and we'll talk about how to create ''listitem'' dynamically with respect to each data object in the next chapter. | ||
| + | |||
| + | '''Extracted from search.zul''' | ||
| + | <source lang="xml"> | ||
| + | <listbox id="carListbox" height="160px" emptyMessage="No car found in the result"> | ||
| + | <listhead> | ||
| + | <listheader label="Model" /> | ||
| + | <listheader label="Make" /> | ||
| + | <listheader label="Price" width="20%"/> | ||
| + | </listhead> | ||
| + | <listitem> | ||
| + | <listcell label="car model"></listcell> | ||
| + | <listcell label="make"></listcell> | ||
| + | <listcell>$<label value="price" /></listcell> | ||
| + | </listitem> | ||
| + | </listbox> | ||
| + | </source> | ||
| + | |||
| + | |||
| + | '''Car Details Area.''' Like the ''hbox'', ''vbox'' is also a layout component which arranges its child component in vertical order. By combing these 2 layout components, we can present more information on a screen. The "style" attribute allows you to customize component's style with CSS syntax. | ||
| + | |||
| + | '''Extracted from search.zul''' | ||
| + | <source lang="xml"> | ||
| + | <hbox style="margin-top:20px"> | ||
| + | <image id="previewImage" width="250px" /> | ||
| + | <vbox> | ||
| + | <label id="modelLabel" /> | ||
| + | <label id="makeLabel" /> | ||
| + | <label id="priceLabel" /> | ||
| + | <label id="descriptionLabel"/> | ||
| + | </vbox> | ||
| + | </hbox> | ||
| + | </source> | ||
| + | |||
| + | |||
| + | You can see the complete zul file through the link in the References section. <ref> [https://code.google.com/p/zkbooks/source/browse/trunk/gettingStarted/getZkUp/WebContent/search.zul search.zul] </ref> | ||
| + | |||
= Automatic UI Controlling = | = Automatic UI Controlling = | ||
Revision as of 09:24, 10 April 2014
Introduction
This tutorial is intended for software developers who have experience in writing Java programs. We will guide you through how to build a modern web application with ZK. The target application we are going to build is a simple car catalog application. In this article, we will present an approach which is classified as the Model-View-ViewModel (MVVM) design pattern. Using this approach, ZK can control components for you automatically and it separates the UI from its controller clearly. In addition, you can also choose to go with the MVC approach that is covered in another tutorial [1].
We also provide the complete source code with an Eclipse project zip file in Import and Run Example Application section.
Tutorial Objective
Our target application is a simple car catalog application. This application has two functions:
- Search cars.
- Enter a keyword in the input field, click Search and search results will be displayed in the car list below.
- View details.
- Click an item from the car list, the area below the car list will show the selected car's details including model, price, description, and preview.

Warm Up
This section guides you through how to setup a project and use ZK in Eclipse. If you want to know how to build the application with ZK first, please skip it and start from Declaring Domain Class. To begin, we will start with how to prepare an environment to build a ZK web application in including setting the IDE, installing ZK, and running an application in a server.
Setup Eclipse
In this tutorial, Eclipse IDE 3.7 (indigo) for Java EE developer ![]() is used to demonstrate the building of the car catalog application. (Download Eclipse here, extract the downloaded zip file to a folder and execute eclipse.exe to run Eclipse.)
is used to demonstrate the building of the car catalog application. (Download Eclipse here, extract the downloaded zip file to a folder and execute eclipse.exe to run Eclipse.)
In order to edit ZK UI pages in Eclipse, add "zul" (ZK UI page's file extension name) as a content type of XML format following these steps below:
- Select Window \ Preferences to open Preferences window
- On the left, select General --> Content Types. On right, expand Text node in "Content types" box and select XML
- Click Add and type in the content type you wish to add which is *.zul in this case, then click OK

After this has been done, Eclipse will use XML editor to open your zul file.
Install ZK in a Web Project
Download ZK
Download the ZK CE first (file name would look like zk-bin-[version].zip) and extract it to a folder.
Create a Project
To build a web application, first, create a "Dynamic Web Project" in Eclipse:
- Select File \ New \ Dynamic Web Project
- Enter tutorial in Project name and keep everything else default.

- You can leave "Target runtime" as "none".
- Notice that we set Dynamic web module version to 3.0 because we want to use Servlet 3.0 to eliminate application configuration.
Install ZK JAR
To use ZK in your project, you have to copy ZK JAR files into your project's library folder.
Copy the JAR files from the following directory to WebContent\WEB-INF\lib:
- {YOUR_ZK_UNZIP_FOLDER}\dist\lib
- {YOUR_ZK_UNZIP_FOLDER}\dist\lib\ext
![]() If you prefer to use an application server that supports older (< 3.0) Servlet specification or JDK 1.5, you need to add more configuration on web.xml. Please refer to ZK Installation Guide. [2]
If you prefer to use an application server that supports older (< 3.0) Servlet specification or JDK 1.5, you need to add more configuration on web.xml. Please refer to ZK Installation Guide. [2]
Create a Simple Page
After installation, you can create a simple zul to verify if the installation has been successful or not.
In Eclipse,
- Select File \ New \ File (or File \ New \ Other \ File ) to add a new file, hello.zul, under WebContent.
- Click Source tab to modify source.
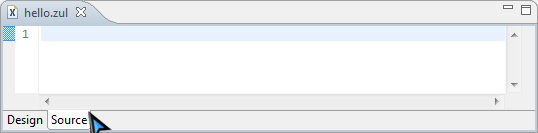 creating a zul-file in eclipse's xml editor
- Copy and paste the following sample code into hello.zul and save.

hello.zul
 <window title="My First ZK Application" border="normal">
 	Hello World!
 </window>
Now, in Project Explorer view your project would look something like:

If you cannot find Project Explorer view, select menu Window \ Show View \ Project Explorer to open it.
Run an Application
Before running a web application, we must create a server in Eclipse. Select Window \ Preferences to open Preferences window and select Server \ Runtime Environments from the left. Click Add to add a server runtime environment.

Select Apache \ Tomcat v7.0 Server as it supports Servlet 3.0 and tick Create a new local server, then click Next.
![]() If you use JDK 1.5, you could choose Tomcat v6.0 but you will need more configuration on web.xml. Please refer to ZK Installation Guide in References .
If you use JDK 1.5, you could choose Tomcat v6.0 but you will need more configuration on web.xml. Please refer to ZK Installation Guide in References .

If you have installed Tomcat 7 previously, simply provide the directory path. If you haven't, proceed with the following steps:
- Click Download and Install and choose a folder.
- Notice that the installation path must not contain non-ASCII characters.
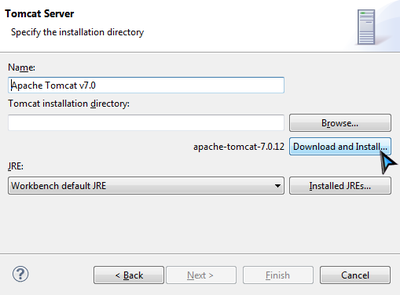
- Accept the license agreement and wait.
- Eclipse will show an error message before installation completes, please ignore this message.

- Please wait and do not interrupt the installation before it completes to ensure that the installation has been done properly.

- Eclipse will download and install Tomcat into the folder you have specified.
- After the installation has been completed, click Finish


Now you should be able to see a new entry in Server runtime environments.

Right click on hello.zul and select Run As \ Run on Server to run this zul on an application server.

Choose an existing Tomcat 7. Yon can also tick Always use this server when running this project option to avoid choosing a server each time you run the application in the future. Click Finish and wait for the server to start running.

After the server starts running, Eclipse will open a browser and connect to http://localhost:8080/tutorial/hello.zul automatically . If you can see the following image, then your project is ready to use ZK.

You can come back and follow these steps to run your application during this tutorial
Import and Run Example Application
We have prepared an Eclipse project zip file that contains the complete source code, you can download and import it to your Eclipse without having to start from scratch.
To use example application, follow the steps below:
- Download example application project zip file.
- In Eclipse, select File \ Import \ General \ Existing Projects into Workspace, choose Select archive file to import example application zip file as a project into your Eclipse.
- Then follow the instructions from Run an Application to run it.
Declaring Domain Class
The following is the domain object that represents a car.
public class Car {
	private Integer id;
	private String model;
	private String make;
	private String preview;
	private String description;
	private Integer price;
	//omit getter and setter for brevity
}
- Please refer to References section to see the complete code. [3]
We then define a service class to perform the business logic (search cars) shown below:
public interface CarService {

	/**
	 * Retrieve all cars in the catalog.
	 * @return all cars
	 */
	public List<Car> findAll();

	/**
	 * search cars according to keyword in  model and make.
	 * @param keyword for search
	 * @return list of car that match the keyword
	 */
	public List<Car> search(String keyword);
}
In this example, we have defined a class - CarServeImpl that implements the above interface. For simplicity, it uses a static list object as the data model. You can rewrite it so that it connects to a database in a real application. Implementation details are not in the scope of this article, please refer to References section.[4]
Building the User Interface
UI Design is a good start to building an application as it helps you define the scope of your application. ZK provides hundreds of readily-made UI components so developers can rapidly build their desired user interface by combining and mix matching these components without having to create them from scratch.
In ZK, you can use ZK User Interface Markup Language (ZUML) [5], an XML-formatted language, to describe UI. By ZK's convention, the files to describe user interface with ZUML uses .zul as the name suffix. In zul files, one component can be represented as an XML element (tag) and you can configure each component's style, behavior, and function by setting XML element's attributes.[6]
In the case of this example application, first of all, we want to design a window with specified title and normal border as our application's frame.
Extracted from search.zul
	<window title="Search" width="600px" border="normal">
		<!-- put child components inside a tag's body -->
	</window>
As window is the outermost component, it is called the root component. Window is a commonly used container because it is a basic display element of a desktop-like application while it can also enclose other components. All other components inside window are called child components and should be put in window tag's body. We set window's title bar text with "title" attribute and make window display a normal border with "border" attribute. For "width" attribute, use CSS like syntax such as "800px" or "60%".
Basically, our example application's user interface is divided into 3 areas within the window, they are (from top to bottom) search function, car list, and car details.

Search Area:
ZK components are like building blocks, you can combine and mix match existing components to construct your desired UI. To allow users to search, we need a text to prompt users for input, a place to enter keywords, and a button for triggering the search. We can use the following ZK components to fulfill this requirement:
Extracted from search.zul
	 	<hbox align="center">
	 		Keyword:
	 		<textbox id="keywordBox" />
	 		<button id="searchButton" label="Search" image="/img/search.png" />
	 	</hbox>
hbox is a layout component that arranges its child components horizontally and you can probably guess by now that the h represents horizontal. As these child components have different heights, we set the "align" attribute to "center" so they are aligned neatly along their center line. Here we also specify an "id" attribute for some components which allows you to control them by referencing their id. You can also easily create an image button by specifying the path for the "image" attribute.
Car List Area. ZK provides several components to display a collection of data such as listbox, grid, and tree. In this example, we have chosen to use a listbox to display a list of cars with 3 columns: Model, Make and Price. We set the "height" attribute so the number of rows visible is limited with respect to the height specified; you can drag scroll-bar to see the rest of rows. The "emptyMessage" attribute is used to show a message when listbox contains no items. The listbox is a container component, and you can add listhead to define a column. The listitem is used to display data, and the number of listcell in one listitem should equal to the number of listheader. Here we use listcell with static label to demonstrate structure of a listitem, and we'll talk about how to create listitem dynamically with respect to each data object in the next chapter.
Extracted from search.zul
	 	<listbox id="carListbox" height="160px" emptyMessage="No car found in the result">
			<listhead>
				<listheader label="Model" />
				<listheader label="Make" />
				<listheader label="Price" width="20%"/>
			</listhead>
			<listitem>
				<listcell label="car model"></listcell>
				<listcell label="make"></listcell>
				<listcell>$<label value="price" /></listcell>
			</listitem>
		</listbox>
Car Details Area. Like the hbox, vbox is also a layout component which arranges its child component in vertical order. By combing these 2 layout components, we can present more information on a screen. The "style" attribute allows you to customize component's style with CSS syntax.
Extracted from search.zul
		<hbox style="margin-top:20px">
			<image id="previewImage" width="250px" />
			<vbox>
				<label id="modelLabel" />
				<label id="makeLabel" />
				<label id="priceLabel" />
				<label id="descriptionLabel"/>
			</vbox>
		</hbox>
You can see the complete zul file through the link in the References section. [7]
Automatic UI Controlling
The approach we introduce here to control user interaction is to let ZK control UI components for you. This approach is classified to Model-View-ViewModel (MVVM) design pattern. [8] This pattern divides an application into three parts.
The Model consists of application data and business rules. CarService and other classes used by it represent this part in our example application.
The View means user interface. The zul page which contains ZK components represents this part. A user's interaction with components triggers events to be sent to controllers.
The ViewModel is responsible for exposing data from the Model to the View and providing required action requested from the View. The ViewModel is type of View abstraction which contains a View's state and behavior. But ViewModel should contain no reference to UI components. ZK framework handles communication and state synchronization between View and ViewModel.
Under this approach, we just prepare a ViewModel class with proper setter, getter and behavior methods, then assign data binding expression to a component's attributes in a ZUL. There is a binder in ZK which will synchronize data between ViewModel and components and handle events automatically according to binding expressions. We don't need to control components by ourselves.
Here we use search function to explain how MVVM works in ZK. Assume that a user click "Search" button then listbox updates its content. The flow is as follows:

- A user clicks "Search" button and a corresponding event is sent.
- ZK's binder invokes the corresponding command method in the ViewModel.
- The method accesses data from Model and updates some ViewModel's properties.
- ZK's binder reloads changed properties from the ViewModel to update component's states.
Abstracting the View
ViewModel is an abstraction of View. Therefore when we design a ViewModel, we should analysis UI's functions for what state it contains and what behavior it has.
The state:
- keyword from user input
- car list of search result
- selected car
The behavior:
- search
According to above analysis, the ViewModel should have 3 variables for above states and one method for the behavior. In ZK, creating a ViewModel is like creating a POJO, and it exposes its states like JavaBean's properties through setter and getter methods. The search method implements search logic with service class and updates the property "carList".
SearchViewModel.java
package tutorial;

import java.util.List;
import org.zkoss.bind.annotation.*;

public class SearchViewModel {

	private String keyword;
	private List<Car> carList;
	private Car selectedCar;

	//omit getter and setter

	public void search(){
		carList = carService.search(keyword);
	}
}
Annotation
In ZK MVVM, any behavior which can be requested by a View is a command in a ViewModel. We can bind a component's event to the command and ZK will invoke the method when bound event is triggered. In order to let ZK know which behavior (method) can be requested, you should apply an annotation @Command on a method. We mark search() as a "command" with default command name, search, which is the same as method name. The command name is used in data binding expression we'll talk about in next section.
In search(), we change a ViewModel's property: carList. Thus, we should tell ZK this change with @NotifyChange so that ZK can reload the changed property for us after it invokes this method.
For "search" command, it looks like:
SearchViewModel.java
package tutorial;

import java.util.List;
import org.zkoss.bind.annotation.*;

public class SearchViewModel {

	//omit other codes

	@Command
	@NotifyChange("carList")
	public void search(){
		carList = carService.search(keyword);
	}
}
For complete source code, please refer to References section. [9]
Binding UI to ViewModel
Under MVVM, we build our UI as same as we would with the MVC approach, then we specify relationship between a ZUL and a ViewModel by writing data binding expression in component's attribute, and let ZK handle components for us.
To bind a component to a ViewModel, we should apply a composer called org.zkoss.bind.BindComposer. This composer processes data binding expressions and initializes the ViewModel class. We then bind this component to a ViewModel by setting its viewModel attribute with following syntax:
@id('ID') @init('FULL.QUALIFIED.CLASSNAME')
- @id() is used to set ViewModel's id to whatever we want like a variable name. We will use this id to reference ViewModel's properties (e.g. vm.carList) in a data binding expression.
- We should provide full-qualified class name for @init() to initialize the ViewModel object.
Extracted from searchMvvm.zul
	<window title="Search" width="600px" border="normal"
		apply="org.zkoss.bind.BindComposer" viewModel="@id('vm') @init('tutorial.SearchViewModel')">
	<!-- omit other tags-->
	</window>
After binding the ViewModel to the component, all its child components can access the same ViewModel and its properties.
We can bind View to both ViewModel's properties and behavior with data binding expression. Let's see how to use data binding to achieve search function.
Since we have declared variables in ViewModel class for component's states in previous section, we can bind component's attributes to them. After binding a component's attribute to ViewModel, ZK will synchronize data between attribute's value and a ViewModel's property for us automatically. We can specify which attribute is bound to which property by writing data binding expression as a component attribute's value with syntax:
@bind(vm.aProperty)
- Remember that vm is the id we have given it in @id() previously and now we use it to reference ViewModel object.
There are 2 states which relate to search function to be stored in the ViewModel upon previous analysis. First, we want to store value of textbox in ViewModel's keyword. We can then bind "value" of textbox to vm.keyword with @bind(vm.keyword). Second, we want to store the data model of a listbox in ViewModel's carList, so we should bind listbox's "model" to vm.carList.
Extracted from searchMvvm.zul
		<hbox>
			Keyword:
			<textbox value="@bind(vm.keyword)" />
			<button label="Search" image="/img/search.png"/>
		</hbox>
		<listbox height="160px" model="@bind(vm.carList)" emptyMessage="No car found in the result">
		<!-- omit other tags -->
We can only bind a component's event attribute (e.g. onClick) to ViewModel's behavior. After we bind an event to a ViewModel, each time a user triggers the event, ZK finds the bound command method and invokes it. In order to handle clicking on "Search" button, we have to bind button's onClick attribute to a command method with following syntax:
@command('COMMAND_NAME')
- We should look for command name specified in our ViewModel's command method.
Extracted from searchMvvm.zul
		<hbox>
			Keyword:
			<textbox value="@bind(vm.keyword)" />
			<button label="Search" image="/img/search.png" onClick="@command('search')" />
		</hbox>
		<listbox height="160px" model="@bind(vm.carList)" emptyMessage="No car found in the result">
		<!-- omit other tags -->
After binding this "onClick" event, when a user clicks "Search" button, ZK will invoke search() and reload the property "carList" which is specified in @NotifyChange.
Displaying Data Collection
The way to display a collection of data with data binding is very similar to the way in MVC approach. we will use a special tag, <template> [10], to control the rendering of each item. The only difference is we should use data binding expression instead of EL.
Steps to use <template> :
- Use <template> to enclose components that we want to create iteratively.
- Set template's "name" attribute to "model". [11]
- Use implicit variable, each, to assign domain object's properties to component's attributes.
Extracted from searchMvvm.zul
		<listbox height="160px" model="@bind(vm.carList)" emptyMessage="No car found in the result">
			<listhead>
				<listheader label="Model" />
				<listheader label="Make" />
				<listheader label="Price" width="20%"/>
			</listhead>
			<template name="model">
				<listitem>
					<listcell label="@bind(each.model)"></listcell>
					<listcell label="@bind(each.make)"></listcell>
					<listcell>$<label value="@bind(each.price)" />
					</listcell>
				</listitem>
			</template>
		</listbox>
Implementing View Details Functionality
The steps to implement the view details functionality are similar to previous sections.
- We bind attribute selectedItem of listbox to the property vm.selectedCar to save selected domain object.
- Because we want to show selected car's details, we bind value of label and src of image to selected car's properties which can be access by chaining dot notation like vm.selectedCar.price.
- Each time a user selects a listitem, ZK saves selected car to the ViewModel. Then ZK reloads selectedCar's properties to those bound attributes.
		<listbox height="160px" model="@bind(vm.carList)" emptyMessage="No car found in the result"
		selectedItem="@bind(vm.selectedCar)">
		<!-- omit child components -->
		</listbox>
		<hbox style="margin-top:20px">
			<image width="250px" src="@bind(vm.selectedCar.preview)" />
			<vbox>
				<label value="@bind(vm.selectedCar.model)" />
				<label value="@bind(vm.selectedCar.make)" />
				<label value="@bind(vm.selectedCar.price)" />
				<label value="@bind(vm.selectedCar.description)" />
			</vbox>
		</hbox>
You can view complete zul in References. [12]
Approach Comparison
The interaction picture at left side is MVC, and the one at right side is MVVM. The main differences are that Controller changes to ViewModel and there is a binder to synchronize data instead of a Controller in MVVM .

MVC
MVVM
Both approaches can achieve many things in common, but there are still some differences between them. Each of two approaches has its strength. Building an application with MVC approach is more intuitive, because you directly control what you see. Its strength is that you have total control of components, so that you can create child components dynamically, control custom components, or do anything a component can do.
In MVVM, because ViewModel is loosely-coupled with View (it has no reference to components), one ViewModel may associate with multiple Views without modification. UI designers and programmers may work in parallel. If data and behavior do not change, a View's change doesn't cause ViewModel to be modified. In addition, as ViewModel is a POJO, it is easy to perform unit test on it without any special environment. That means ViewModel has better reusability, testabiliby, and better resistance against View change.
To summarize, a comparison table is illustrated below:
| Coupling with View | Loose with layout | Loose |
|---|---|---|
| Coupling with Component | Tight | Loose |
| Coding in View | Component ID | Data binding expression |
| Controller Implementation | Extends ZK's composer | a POJO |
| UI Data Access | Direct access | Automatic |
| Backend Data Access | Direct access | Direct access |
| UI Updating | Manipulate components | Automatic(@NotifyChange) |
| Component Controlling Granularity | Fine-grained | Normal |
| Performance | High | Normal |
References
- ↑ ZK Getting Started/Get ZK Up and Running with MVC
- ↑ ZK Installation Guide \ Create and Run Your First ZK Application Manually
- ↑ Car.java
- ↑ CarService.java CarServiceImpl.java
- ↑ ZUML Reference
- ↑ ZK Component Reference
- ↑ search.zul
- ↑ MVVM in Developer's Reference
- ↑ SearchViewModel.java
- ↑ ZK Developer's Reference/MVC/View/Template
- ↑ ZK Developer's Reference/MVC/View/Template/Listbox Template
- ↑ searchMvvm.zul