CRUD Calendar Items"
| Line 54: | Line 54: | ||
</source> | </source> | ||
| + | [[File: creationbox-popup.jpg | center]] | ||
== Create New Item == | == Create New Item == | ||
Revision as of 10:43, 2 February 2021
Since 3.0.0
CRUD Example
Since Calendars support model-driven display, to manipulate (CRUD) items on the calendars, you actually need to manipulate CalendarModel via add() and remove(). By default, when an end-user interacts with this component, it doesn't add or delete items automatically. Application developers need to add event listeners to implement creation, update, and deletion of CalendarItem by themselves.
Here we demonstrate the basic approach with CalendarCrudComposer and the default implementation: SimpleCalendarModel and DefaultCalendarItem. Since DefaultCalendarItem is immutable, we need to remove the original one and add a new one for updating an item.
Create
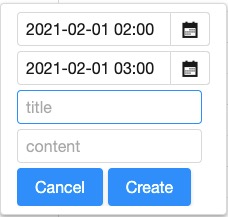
Creation Popup
To allow users input, we need to build UI for properties of DefaultCalendarItem. Here is a simple example:
        <popup id="creationBox">
            <vlayout>
                <datebox id="beginBox" placeholder="beginning date" format="yyyy-MM-dd HH:mm" hflex="min"/>
                <datebox id="endBox" placeholder="end date" format="yyyy-MM-dd HH:mm" hflex="min"/>
                <textbox id="titleBox" placeholder="title"/>
                <textbox id="contentBox" placeholder="content"/>
                <hlayout>
                    <button label="Cancel"/>
                    <button id="update" label="Update"/>
                    <button id="delete" label="Delete"/>
                    <button id="create" label="Create"/>
                </hlayout>
            </vlayout>
        </popup>
Show the Popup
Then we need to add an event listener to open this popup and initialize UI with user-clicked date/time.
    @Listen(CalendarsEvent.ON_ITEM_CREATE + " = #calendars")
    public void showCreationBox(CalendarsEvent event) {
        //initialize datebox with the user-clicked date/time
        beginBox.setValue(event.getBeginDate());
        endBox.setValue(event.getEndDate());
        //reset previous values
        titleBox.setValue("");
        contentBox.setValue("");
        //put focus for user convenience
        titleBox.setFocus(true);

        toCreateMode();
        creationBox.open(calendars, "middle_center");
    }
Create New Item
When an end-user clicks "Create" button, it invokes the listener below to instantiate a DefaultCalendarItem:
    @Listen(Events.ON_CLICK + " = button[label='Create']")
    public void create() {
        DefaultCalendarItem item = new CalendarItemBuilder()
                .setBegin(beginBox.getValue().toInstant())
                .setEnd(endBox.getValue().toInstant())
                .setTitle(titleBox.getValue())
                .setContent(contentBox.getValue())
                .build();

        model.add(item);
        closeCreationBox();
    }
- Line 3: CalendarItemBuilder is a helper class we made for this example. It helps us to create a DefaultCalendarItem with fewer parameters. Since DefaultCalendarItem's constructor requires many parameters.
- Line 10: We need to add the new item to SimpleCalendarModel to show it on Calendars.
Read
To display items on a Calendar you need to create a CalendarModel, please refer to Displaying Calendar Items.
Update
Move or Change Time Span
When an end-user drag to move or change the time span of a calendar item, we also need to handle the event. So the user-dragged item is really updated.
    @Listen(CalendarsEvent.ON_ITEM_UPDATE + " = #calendars")
    public void move(CalendarsEvent event) {
        selectedItem = (DefaultCalendarItem) event.getCalendarItem();
        model.remove(selectedItem);

        DefaultCalendarItem movedItem = new CalendarItemBuilder(selectedItem)
                .setBegin(event.getBeginDate().toInstant())
                .setEnd(event.getEndDate().toInstant())
                .build();
        model.add(movedItem);
    }
- Line 7-8: set updated date.
Edit
When an end-user clicks an existed item, we open the creation popup for editing.
Show the Item to Edit
Load item properties from the clicked item.
    @Listen(CalendarsEvent.ON_ITEM_EDIT + " = #calendars")
    public void edit(CalendarsEvent event) {
        selectedItem = (DefaultCalendarItem) event.getCalendarItem();
        beginBox.setValueInLocalDateTime(LocalDateTime.ofInstant(selectedItem.getBegin(), calendars.getDefaultTimeZone().toZoneId()));
        endBox.setValueInLocalDateTime(LocalDateTime.ofInstant(selectedItem.getEnd(), calendars.getDefaultTimeZone().toZoneId()));
        titleBox.setValue(selectedItem.getTitle());
        contentBox.setValue(selectedItem.getContent());
        toEditMode();
        creationBox.open(calendars, "middle_center");
    }
Save Edit Back
Because of immutability, we still need to remove the old item and create a new one with updated properties.
    @Listen(Events.ON_CLICK + " = button[label='Update']")
    public void update() {
        model.remove(selectedItem);

        DefaultCalendarItem newItem = new CalendarItemBuilder(selectedItem)
                .setBegin(beginBox.getValue().toInstant())
                .setEnd(endBox.getValue().toInstant())
                .setTitle(titleBox.getValue())
                .setContent(contentBox.getValue()).build();
        model.add(newItem);
        closeCreationBox();
    }
Delete
When an end-user clicks an existed item, we already save it to selectedItem.
@Listen(CalendarsEvent.ON_ITEM_EDIT + " = #calendars")
public void edit(CalendarsEvent event) {
    selectedItem = (DefaultCalendarItem) event.getCalendarItem();
Therefore, the "Delete" button listener just removes the selected item.
    @Listen(Events.ON_CLICK + " = button[label='Delete']")
    public void delete() {
        model.remove(selectedItem);
        closeCreationBox();
    }
The example project is at Github
