Chapter 5: Handling User Input
Target Application
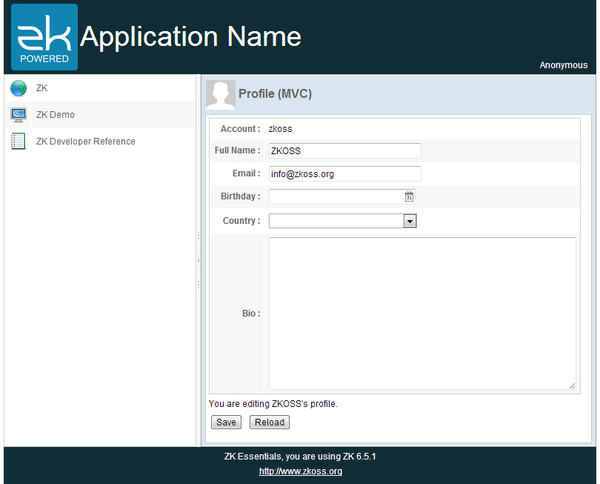
This chapter we will demonstrate a common scenario: collecting user input in form-based page. The target application looks as follows:
There is a personal profile form with 5 different fields. Click the "Save" button saves users input and click the "Reload" button loads previous saved data back to the form. We will show how to implement these functions in both MVC and MVVM approach.
MVC Approach
Under this approach, we implement all event handling and presentation logic in a composer instead of in <zscript/> and make a zul clear from codes. This approach make the responsibility of each role (Model, View, and Controller) more cohesive and allows you to control components directly. It is very intuitive and very flexible.
View
With the concept and technique we talked in last chapter, it should be easy to construct a form like user interface as follows. The zul file below is included in the Center of the Border Layout.
chapter5/profile-mvc.zul
<?link rel="stylesheet" type="text/css" href="/style.css"?>
<window apply="org.zkoss.tutorial.chapter5.mvc.ProfileViewController"
	border="normal" hflex="1" vflex="1" contentStyle="overflow:auto">
	<caption src="/imgs/profile.png" sclass="fn-caption" label="Profile (MVC)"/>
	<vlayout>
		<grid width="500px">
			<columns>
				<column align="right" hflex="min"/>
				<column/>
			</columns>
			<rows>
				<row>
					<cell sclass="row-title">Account :</cell>
					<cell><label id="account"/></cell>
				</row>
				<row>
					<cell sclass="row-title">Full Name :</cell>
					<cell>
						<textbox id="fullName" constraint="no empty: Plean enter your full name" width="200px"/>
					</cell>
				</row>
				<row>
					<cell sclass="row-title">Email :</cell>
					<cell>
						<textbox id="email"
						constraint="/.+@.+\.[a-z]+/: Please enter an e-mail address" width="200px"/>
					</cell>
				</row>
				<row>
					<cell sclass="row-title">Birthday :</cell>
					<cell><datebox id="birthday" constraint="no future" width="200px"/></cell>
				</row>
				<row>
					<cell sclass="row-title">Country :</cell>
					<cell>
						<listbox id="country" mold="select" width="200px">
							<template name="model">
								<listitem label="${each}" />
							</template>
						</listbox>
					</cell>
				</row>
				<row>
					<cell sclass="row-title">Bio :</cell>
					<cell><textbox id="bio" multiline="true" hflex="1" height="200px" /></cell>
				</row>
			</rows>
		</grid>
		<hlayout>
			<button id="saveProfile" label="Save"/>
			<button id="reloadProfile" label="Reload"/>
		</hlayout>
	</vlayout>
</window>
- Line 4: Caption can be used to build compound header with image for a Groupbox and Window.
- Line 5: Vlayout is a light-weight layout component which arranges child components vertically without splitter, align, pack support.
- Line 13: Cell is used inside Row, Hbox, or Vbox for fully controlling style and layout.
- Line 19, 26, 31: Specify constraint attribute of a input component can activate client-side validation feature and we will discuss in later section.
- Line 49: Hlayout, like Vlayout, but arrange child components horizontally.
Client Side Validation
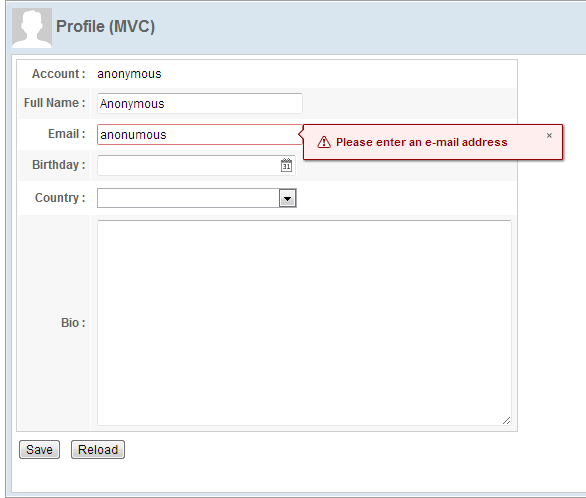
In a input component, we can specify constraint attribute of a input component can activate client-side validation feature and the feature can work without writing any code in a composer. For example:
<textbox id="fullName" constraint="no empty: Plean enter your full name" width="200px"/>
- The constraint rule means "no empty value allowed" for the Textbox.
<textbox id="email" constraint="/.+@.+\.[a-z]+/: Please enter an e-mail address" width="200px"/>
- We define the constraint rule by a regular expression that describes the email format to limit the value in correct format.
Then, the input component will show specified error message when input value doesn't match specified constraint rule.
The constraint in Datebox restricts the available date to choose.
<datebox id="birthday" constraint="no future" width="200px"/>
- The constraint rule means "date in the future is not allowed".
Assume today is 2013/1/18, you can see that no future date available to choose.
Display a Collection of Data
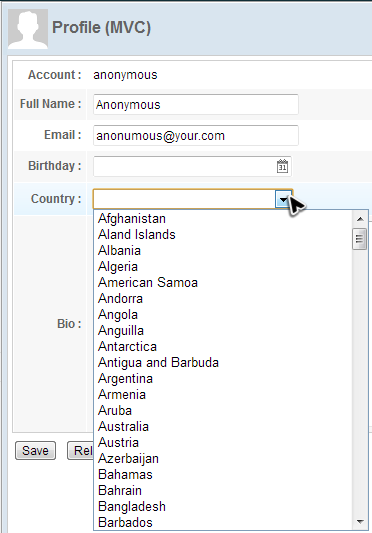
In the profile form, there is a drop-down list that contains a list of country.
It is made by Listbox in "select" mold. The Listbox's data is a list of string provided by the composer and we use a Template to define how to render each object of the data list.
extracted from chpater5/profile-mvc.zul
...
				<row>
					<cell sclass="row-title">Country :</cell>
					<cell>
						<listbox id="country" mold="select" width="200px">
							<template name="model">
								<listitem label="${each}" />
							</template>
						</listbox>
					</cell>
				</row>
...
- Line 5: Some components have multiple molds, and each mold has its own style.
- Line 6 - 8: Template component can create its child components repeatedly upon the data model of parent component, Listbox, and doesn't has a corresponding visual widget itself. The ${each} is an implicit variable that you can use without declaration inside Template, it represents one object of the data list. We specify this variable at component attributes to control how to render data list. In our example, we just make it as a Listitem's label.
Now that let's see how the composer provides the data list to the Listbox.
In ZK, all data components are designed to accept a separate data model that contains data to be rendered. You only have to provide such a data model and a data component will render the data as specified in Template. This increase the data model's reusability and decouple the data from a component's implementation.
For a Listbox, we can provide a ListModelList
Initialize data for a Listbox
public class ProfileViewController extends SelectorComposer<Component>{
	...
	@Wire
	Listbox country;

	@Override
	public void doAfterCompose(Component comp) throws Exception{
		super.doAfterCompose(comp);

		ListModelList<String> countryModel = new ListModelList<String>(CommonInfoService.getCountryList());
		country.setModel(countryModel);

		refreshProfileView();
	}

	...
}
- Line 10: Create a ListModelList object with a list of String
- Line 11: Provide prepared data model object to the component by setModel().
- Line 13: This method reloads the saved data to initialize components, and we will describe the detail in next section.
Handle Events in a Composer
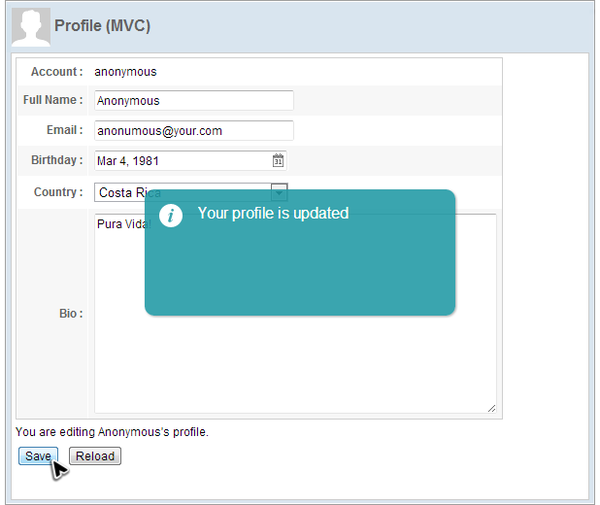
The example application has 2 functions, save and reload, which are both triggered by clicking a button. If you click the "Save" button, the application will save your input and show a notification box.
In this section, we demonstrate the way to add an event listener defined in a composer in @Listen annotation instead of calling a method (mentioned in chapter 4).
An event listener method should be public, with void return type, and has either no parameter or one parameter of the specific event type (corresponding to the event listened) with @Listen in a composer. You should specify event listening rule in the annotation's element value. Then ZK will "wire" the method to the specified components for specified events. ZK provides various options to specify in the annotation, please refer to ZK Developer's Reference/MVC/Controller/Wire Event Listeners.
Listen "Save" button's clicking
public class ProfileViewController extends SelectorComposer<Component>{

	@Listen("onClick=#saveProfile")
	public void doSaveProfile(){
		...
	}
	...
}
- Line 3: The @Listen will make doSaveProfile() be invoked when a user clicks a component whose id is "saveProfile".
We can perform business logic and manipulate components to change the presentation in the event listener. In doSaveProfile(), we get users input from input components and save them to a User object. Then show the notification to the client.
Handle "Save" button's clicking
public class ProfileViewController extends SelectorComposer<Component>{

	//wire components
	@Wire
	Label account;
	@Wire
	Textbox fullName;
	@Wire
	Textbox email;
	@Wire
	Datebox birthday;
	@Wire
	Listbox country;
	@Wire
	Textbox bio;

	@Listen("onClick=#saveProfile")
	public void doSaveProfile(){
		UserCredential cre = authService.getUserCredential();
		User user = userInfoService.findUser(cre.getAccount());
		if(user==null){
			//TODO handle un-authenticated access
			return;
		}

		//apply component value to bean
		user.setFullName(fullName.getValue());
		user.setEmail(email.getValue());
		user.setBirthday(birthday.getValue());
		user.setBio(bio.getValue());

		Set<String> selection = ((Selectable)country.getModel()).getSelection();
		if(!selection.isEmpty()){
			user.setCountry(selection.iterator().next());
		}else{
			user.setCountry(null);
		}

		userInfoService.updateUser(user);

		Clients.showNotification("Your profile is updated");
	}
	...
}
- Line 20: In this chapter's example, UserCredential is pre-defined to "Anonymous".
- Line 27: Get users input by calling getValue(). This method might throw WrongValueException if the component's value doesn't conform to its constraint rule.
- Line 32: Get a user's selection for a Listbox from its model object.
- Line 41: Show a notification box, which is dismissed upon left click.
To wire the event listener for "Reload" button's is similar as previous one, but it pushes saved user data to components by setValue().
public class ProfileViewController extends SelectorComposer<Component>{


	//wire components
	@Wire
	Label account;
	@Wire
	Textbox fullName;
	@Wire
	Textbox email;
	@Wire
	Datebox birthday;
	@Wire
	Listbox country;
	@Wire
	Textbox bio;

	...
	@Listen("onClick=#reloadProfile")
	public void doReloadProfile(){
		refreshProfileView();
	}

	private void refreshProfileView() {
		UserCredential cre = authService.getUserCredential();
		User user = userInfoService.findUser(cre.getAccount());
		if(user==null){
			//TODO handle un-authenticated access
			return;
		}

		//apply bean value to UI components
		account.setValue(user.getAccount());
		fullName.setValue(user.getFullName());
		email.setValue(user.getEmail());
		birthday.setValue(user.getBirthday());
		bio.setValue(user.getBio());

		((Selectable)country.getModel()).addToSelection(user.getCountry());
	}
}
- Line 33~37: Push saved user data to components by setValue().
- Line 39: Control the Listboxs selection by addToSelection()
After above steps, we have finished all functions of the target application.
MVVM Approach
In addition to MVC approach, ZK also allows you to design your application in another architecture: MVVM (Model-View-ViewModel). This architecture also divides an application into 3 parts: View, Model, and ViewModel. The View and Model plays the same roles as they do in MVC. The ViewModel in MVVM acts like a special Controller for the View which is responsible for exposing data from the Model to the View and for providing required action and logic for user requests from the View. The ViewModel is type of View abstraction, which contains a View's state and behavior. The biggest difference from the Controller in the MVC is that ViewModel should not contain reference to UI components and knows nothing about View's visual elements. Hence there is a clear separation between View and ViewModel, this is also the key characteristics of MVVM pattern.
Since the ViewModel contains no reference to UI components, you cannot control components directly e.g. to get value from them or set value to them. Therefore we need a mechanism to synchronize data between the View and ViewModel. Additionally, this mechanism also has to bridge events from the View to the action provided by the ViewModel. This mechanism, the kernel operator of the MVVM design pattern, is a data binding system called "ZK Bind" provided by ZK framework. In this binding system, the binder plays the key role to operate the whole mechanism. The binder is like a broker and responsible for communication between View and ViewModel.
This section we will demonstrate how to implement the same target application with MVVM approach.
View
Building user interface in MVVM approach is nothing different from MVC approach.
Extracted from chapter5/profile-mvvm.zul
<?link rel="stylesheet" type="text/css" href="/style.css"?>
<window border="normal" hflex="1" vflex="1" contentStyle="overflow:auto">
	<caption src="/imgs/profile.png" sclass="fn-caption" label="Profile (MVVM)"/>
	<vlayout>
		<grid width="500px" >
			<columns>
				<column align="right" hflex="min"/>
				<column/>
			</columns>
			<rows>
				<row>
					<cell sclass="row-title">Account :</cell>
					<cell><label/></cell>
				</row>
				<row>
					<cell sclass="row-title">Full Name :</cell>
					<cell><textbox constraint="no empty: Plean enter your full name" width="200px"/></cell>
				</row>
				<row>
					<cell sclass="row-title">Email :</cell>
					<cell><textbox constraint="/.+@.+\.[a-z]+/: Please enter an e-mail address" width="200px"/></cell>
				</row>
				<row>
					<cell sclass="row-title">Birthday :</cell>
					<cell><datebox constraint="no future" width="200px"/></cell>
				</row>
				<row>
					<cell sclass="row-title">Country :</cell>
					<cell>
						<listbox  mold="select" width="200px">
							<template name="model">
								<listitem />
							</template>
						</listbox>
					</cell>
				</row>
				<row>
					<cell sclass="row-title">Bio :</cell>
					<cell><textbox multiline="true" hflex="1" height="200px" /></cell>
				</row>
			</rows>
		</grid>
		<hlayout>
			<button  label="Save"/>
			<button  label="Reload"/>
		</hlayout>
	</vlayout>
</window>
- Line 32: You might notice that there is no EL expression ${each} because we will use data binding to access it.
ViewModel
ViewModel is an abstraction of Model. It extracts the necessary data to be displayed on the View from one or more Model classes. Those data are exposed through getter and setter method like JavaBean's property. ViewModel is also a Model of the View. It contains the View's state (e.g. selection, enablement) that might change during user interaction.
In ZK, ViewModel could be simply a POJO which contains data to display on the ZUL and doesn't have any components. The example application displays 2 kinds of data: the user's profile and country list in the Listbox. The ViewModel should look like the following:
public class ProfileViewModel implements Serializable{

	//services
	AuthenticationService authService = new AuthenticationServiceChapter5Impl();
	UserInfoService userInfoService = new UserInfoServiceChapter5Impl();

	//data for the view
	User currentUser;

	public User getCurrentUser(){
		return currentUser;
	}

	public List<String> getCountryList(){
		return CommonInfoService.getCountryList();
	}

	@Init // @Init annotates a initial method
	public void init(){
		UserCredential cre = authService.getUserCredential();
		currentUser = userInfoService.findUser(cre.getAccount());
		if(currentUser==null){
			//TODO handle un-authenticated access
			return;
		}
	}
	...
}
- Line 4,5: ViewModel usually contains service classes that are used to get data from them or perform business logic.
- Line 8, 10: We should define current user profile data and its getter method to be displayed in the zul.
- Line 14: ViewModel exposes its data by getter methods, it doesn't have to define a corresponding member variable.
In line 18, there is mark annotation for initial method which is at most one in each ViewModel and ZK will invoke this method after instantiating a ViewModel class. We should write initialization logic in it, e.g. get user credential to initialize currentUser.
Apply a ViewModel on a zul
Before data binding can work, we must apply a composer called org.zkoss.bind.BindComposer. It will create a binder for the ViewModel and instantiate the ViewModel's class. Then we should bind a ZK component to our ViewModel by setting its viewModel attribute with the ViewModel's id in @id and the ViewModel's full-qualified class name in @init . The id is used to reference ViewModel's properties, e.g. vm.name, whilst the full-qualified class name is used to instantiate the ViewModel object itself. So that component becomes the Root View Component for the ViewModel. All child components of this Root View Component can access the same ViewModel and its properties, so we usually bind the root component to a ViewModel.
<window apply="org.zkoss.bind.BindComposer"
	viewModel="@id('vm') @init('org.zkoss.tutorial.chapter5.mvvm.ProfileViewModel')"
	border="normal" hflex="1" vflex="1" contentStyle="overflow:auto">
...
</window>
- Line 1: Under MVVM approach, the composer we apply is fixed org.zkoss.bind.BindComposer.
- Line 2: Specify ViewModel's id with @id and the its full-qualified class name in @init for the binder.
Property Binding
Now that ViewModel is prepared and bound to a component, we can binding a component's attributes to the ViewModel's property. The binding between an attribute and a ViewModel's property is called "property binding".


