Chapter 7: Navigation and Templating
Overview
It is easy for users to get lost in a web application because every application has different layout designs and navigation between functions also has lots of different style. One way to help users keep track of where they are is to use consistent design throughout an application, and ZK provides Templating to achieve this. Traditionally, a user usually visits another page to switch another function of an application, a.k.a page-based navigation. In ZK, we can have another choice to design the navigation as desktop-based.
In this chapter, the example application we are going to build looks as follows:
The sidebar is used for navigation control. The lower 4 items lead you to different functions and they only change the central area's content. All other areas keep unchanged to form a consistent layout style among functions.
Templating
Because of web pages can be designed in all kinds of layout, user could get lost easily. To prevent this, you had better keep a consistent design style in your application. In our example application, we want to keep the header, the sidebar, and the footer unchanged whatever function a user chooses. Only the central area switches its content according to the function chosen by users from the sidebar.
Copying from one zul to another to keep the design consistent is hard to maintain. Fortunately, ZK provides a Templating technique that let you define a template zul and apply it to multiple zul pages afterward. All zul pages that apply the same template zul have same layout, so change the template zul can change the layout of all pages once.
The steps to use templating are:
- Create a template zul with anchors defined
- Apply the template in the target zul with zul fragments defined
Then when you visit the target zul page, ZK will insert those fragments to corresponding anchors upon anchor names and combine them as one page.
Create a Template
Creating a template is nothing different from creating a normal zul, but you should define one or more anchor by specifying annotation @inser() at self. You can give any name to identify an anchor that will be used to insert a zul fragment with the same anchor name later.
chapter7/pagebase/layout/template.zul
<zk>
	<borderlayout hflex="1" vflex="1">
		<north height="100px" border="none" >
			<include src="/chapter3/banner.zul"/>
		</north>
		<west width="260px" border="none" collapsible="true" splittable="true" minsize="300">
			<include src="/chapter7/pagebase/layout/sidebar.zul"/>
		</west>
		<center id="mainContent" autoscroll="true" border="none" self="@insert(content)">
		</center>
		<south height="50px" border="none">
			<include src="/chapter3/footer.zul"/>
		</south>
	</borderlayout>
</zk>
- Line 9: Define an anchor with name content
Apply the Template
After creating a template zul, we can apply it in another zul with directive <?init class="org.zkoss.zk.ui.util.Composition" arg0="template_path"?>. This directive tells ZK that this page uses the specified template. Then we also have to define zul fragments that are inserted to the anchor in the template zul with annotation @define(anchorName) at self attribute. The anchorName you specify should correspond to one of anchors defined in the template zul.
chapter7/pagebase/index.zul
<?link rel="stylesheet" type="text/css" href="/style.css"?>
<?init class="org.zkoss.zk.ui.util.Composition" arg0="/chapter7/pagebase/layout/template.zul"?>
<zk>
	<include self="@define(content)" src="/chapter7/pagebase/home.zul"/>
</zk>
- Line 2: Tell ZK that we want to use a template zul for current page and give the path of template zul.
- Line 4: The anchor name content correspond to the anchor name defined in the template zul in previous section.
After above steps, ZK will attach those components in /chapter7/pagebase/home.zul to be the children of <center> in /chapter7/pagebase/layout/template.zul
Traditional web applications are usually designed as page-based navigation. Each function corresponds to a independent page with independent URL. It is very clear for users to know where they are from the URL and they can press "go back" button on their browser to go back to previous pages in history. But the drawback is users have to wait whole page reloading every time they switch to a function. Besides, developers also have to maintain multiple pages that have similar contents but applying a template zul can reduce this problem.
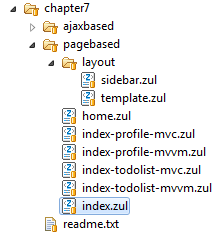
To build a page-based navigation, first you should prepare pages for those items in the sidebar.
From above image, you can see there are four zul pages under "chpater7\pagebase" (index-profile-mvc.zul, index-profile-mvvm.zul, index-todolist-mvc.zul, index-todolist-mvvm.zul) and each page corresponds to each item in the sidebar. Then we can link four items of the sidebar to these zul pages by redirecting a browser.
Our example application creates those menu items dynamically upon a configuration, so we should initialize configuration.
public class SidebarPageConfigPagebaseImpl implements SidebarPageConfig{

	HashMap<String,SidebarPage> pageMap = new LinkedHashMap<String,SidebarPage>();
	public SidebarPageConfigPagebaseImpl(){
		pageMap.put("zk",new SidebarPage("zk","www.zkoss.org","/imgs/site.png","http://www.zkoss.org/"));
		pageMap.put("demo",new SidebarPage("demo","ZK Demo","/imgs/demo.png","http://www.zkoss.org/zkdemo"));
		pageMap.put("devref",new SidebarPage("devref","ZK Developer Reference","/imgs/doc.png","http://books.zkoss.org/wiki/ZK_Developer's_Reference"));

		pageMap.put("fn1",new SidebarPage("fn1","Profile (MVC)","/imgs/fn.png","/chapter7/pagebase/index-profile-mvc.zul"));
		pageMap.put("fn2",new SidebarPage("fn2","Profile (MVVM)","/imgs/fn.png","/chapter7/pagebase/index-profile-mvvm.zul"));
		pageMap.put("fn3",new SidebarPage("fn3","Todo List (MVC)","/imgs/fn.png","/chapter7/pagebase/index-todolist-mvc.zul"));
		pageMap.put("fn4",new SidebarPage("fn4","Todo List (MVVM)","/imgs/fn.png","/chapter7/pagebase/index-todolist-mvvm.zul"));
	}

	...

}
- Line 9~12: Specify URL and related data for each menu item's configuration.
The following codes show how to redirect user to a independent page when they click a menu item in the sidebar.
public class SidebarPagebaseController extends SelectorComposer<Component>{

	...

	//wire service
	SidebarPageConfig pageConfig = new SidebarPageConfigPagebaseImpl();

	@Override
	public void doAfterCompose(Component comp) throws Exception{
		super.doAfterCompose(comp);

		//to initial view after view constructed.
		Rows rows = fnList.getRows();

		for(SidebarPage page:pageConfig.getPages()){
			Row row = constructSidebarRow(page.getName(),page.getLabel(),page.getIconUri(),page.getUri());
			rows.appendChild(row);
		}
	}

	private Row constructSidebarRow(String name,String label, String imageSrc, final String locationUri) {

		//construct component and hierarchy
		Row row = new Row();
		Image image = new Image(imageSrc);
		Label lab = new Label(label);

		row.appendChild(image);
		row.appendChild(lab);

		//set style attribute
		row.setSclass("sidebar-fn");

		EventListener<Event> actionListener = new SerializableEventListener<Event>() {
			private static final long serialVersionUID = 1L;

			public void onEvent(Event event) throws Exception {
				//redirect current url to new location
				Executions.getCurrent().sendRedirect(locationUri);
			}
		};

		row.addEventListener(Events.ON_CLICK, actionListener);

		return row;
	}
}
- Line 15: Create menu items in the sidebar upon configurations with Rows.
- Line 39: Add a event listener to redirect a browser to the URL specified in the menu item a user clicks.
Visit http://localhost:8080/tutorial/chapter7/pagebase/index.zul to see the result.
