Get ZK Up and Running with MVC
Introduction
This tutorial is intended for software developers who have experience in writing Java program with Eclipse. We will guide you how to build a modern web application with ZK. The target application we are going to build is a simple bookstore catalog application. You will also learn basic concepts of ZK during this tutorial.
You can take look at [http:// target application's live demo].
We also provide the complete source code with an Eclipse project zip file in Download section. To run the application please refer to Run on Server
Installation
Prerequisite
We use Eclipse IDE 3.7 (indigo) for Java EE developer (Download Eclipse) to demonstrate the whole instructions.
Create a Web Project
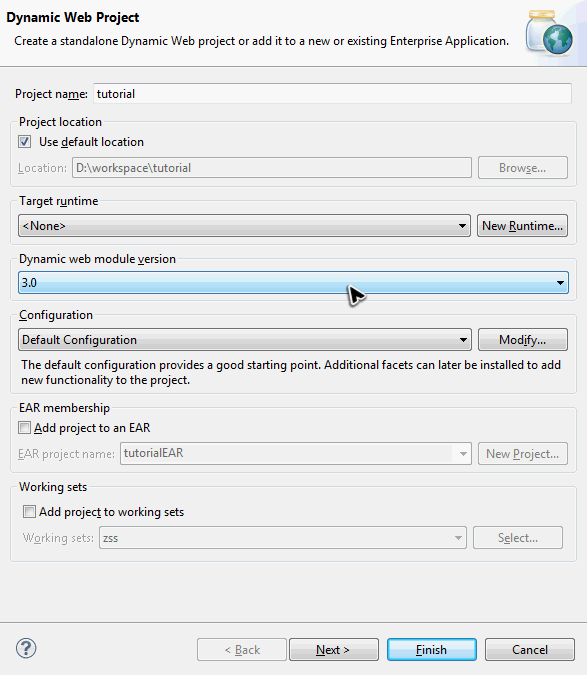
In Eclipse, select File \ New \ Dynamic Web Project, enter zktutorial in Project name and keep every thing else default.
Download
Download the ZK CE (file name should be zk-bin-6.0.0.zip) and extract it to a folder.
Add ZK JAR to Your Project
To use ZK in your project, you have to copy ZK JAR into your project's library folder.
Copy JAR files under following list to zktutorial/WEB-INF/lib:
- {YOUR_ZK_UNZIP_FOLDER}/dist/lib
- {YOUR_ZK_UNZIP_FOLDER}/dist/lib/ext
Create a Simple Page
After installation, you can create a simple zul to verify the installation works or not. In Eclipse, select File / New / File or File / New / Other / File to add a new file, hello.zul, under WebContent. Copy and paste the following sample code into hello.zul and save it.
hello.zul
 <window title="My First ZK Application" border="normal">
 	Hello World!
 </window>
Run on the Server
Right click on hello.zul, in context menu, select Run As / Run on Server to run this zul on an application server.
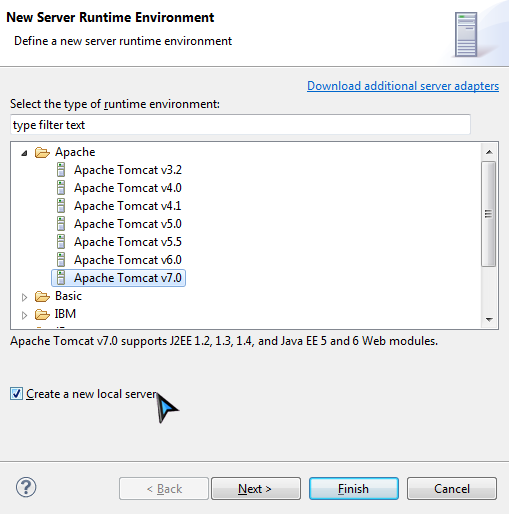
If you have defined servers before, choose an existing server. If you don't, select Manually define a new server and select Tomcat v7.0 Server . Then click "Next".
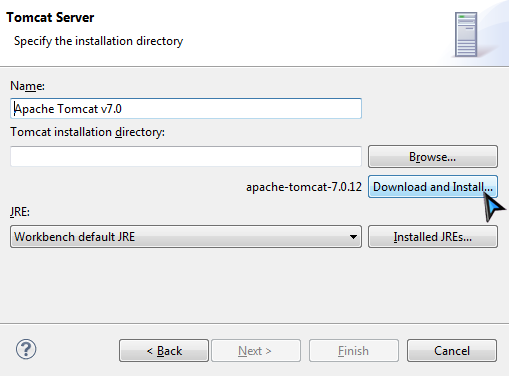
If you have installed Tomcat before, just provide your path. If you don't, just click Download and Install button and choose a folder, accept the license agreement, wait for a minute. Eclipse will download and install Tomcat into the folder you specified. After installation is complete, the Finish button will become enabled. Click it to finish to wait for server starting.
Eclipse opens an internal browser automatically and connects to http://localhost:8080/hello.zul. If you can see the following image, then your installation is success.
If you prefer to use Tomcat 6, please refer to ZK Installation Guide. [1]
Example Application
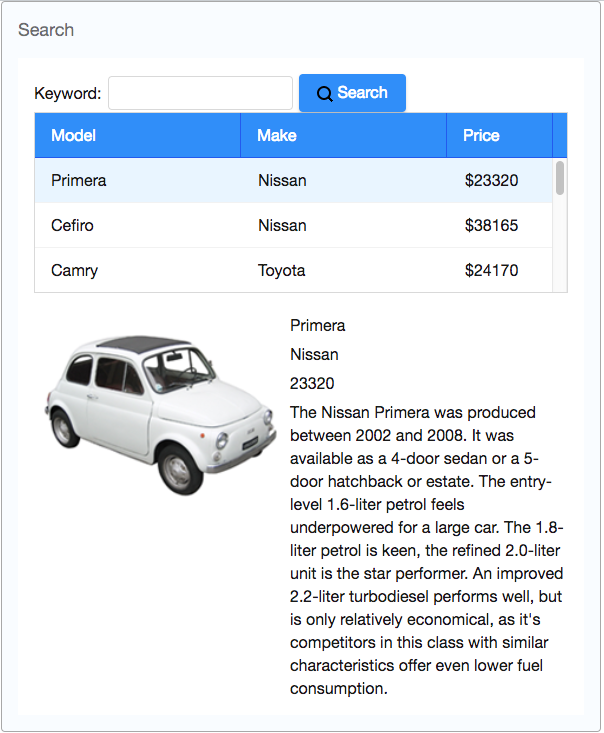
Our target application is a simple bookstore catalog application. This application only has 2 main functions:
- Search books by book name keyword
- Enter a keyword in the textbox on the upper part of a window, click search button and it displays the search result in the book list below.
- View a book's details. (including name, price, description, and cover preview)
- Click any item of the book list, then the area below the book list shows the selected book's detail data.
The following is the domain object that represents a book.
public class Book {
	private Integer id;
	private String name;
	private String thumbnail;
	private String description;
	private Float price;
	//omit getter and setter for brevity
}
- The "thumbnail" property stores the absolute path of book cover preview image.
- Please refer to References section to see the complete code. [2]
Then we define a service class to perform the business logic (search books) as follows:
public interface BookService {

	/**
	 * Retrieve all books in the bookstore.
	 * @return all books
	 */
	public List<Book> findAll();

	/**
	 * search books according to keyword.
	 * @param keyword book name's keyword
	 * @return list of book that match the keyword
	 */
	public List<Book> search(String keyword);
}
- The implementation detail is not in this article's scope, please refer to References section.[3]
Sketch User Interface
Design UI is a good step to start building an application, since it helps you define the scope of your application. In ZK, you can use ZK User Interface Markup Language (ZUML) [4], an XML-formatted language, to describe user interface. In ZK default convention, the files to describe user interface use .zul as file name suffix. One XML element (tag) represents a component, and each component's style, behavior, and function can be configured by setting XML element's attributes.[5] For example, the following code is a window with specified title and normal border of our example application.
Extracted from search.zul
	<window title="Search Product" width="800px" border="normal" style="padding-top:10px;padding-left:10px;">
		<!-- put child components inside a tag's body -->
	</window>
We use a window as our application's frame. As it is the outmost component, it's called the root component. Window is a mostly common used container because it's a basic display element of a desktop-like application and it can also encloses other components. All other components inside the window should be put in window tag's body, and they are called child component. Window has several display modes. By default, it is in the embedded mode. We set window's title bar text with "title" attribute and make window display a normal border with "border" attribute. For "width" attribute, use CSS like syntax such as "800px", "60%". The "style" attribute allows you to customize component's style with CSS syntax.
Basically, our example application's user interface is divided into 3 areas inside a window, they are (from top to bottom) search function, book list, and book details area.
search
book list
book details
Search Area.
ZK components are like building blocks, you can combine existing components to construct your desired user interface. To allow users to search, we need a place to enter keywords, a button for triggering search, and a text to tell user what they should input. We can use following zk components to fulfill this requirement:
Extracted from search.zul
	 	<hbox>
	 		<label>Book Name Keyword:</label>
	 		<textbox id="keywordBox" />
	 		<button id="searchButton" label="Search" image="/img/search.png" />
	 	</hbox>
The hbox ("h" means horizontal) is a layout component and it can arrange its child components in horizontal order. Here we specify "id' attribute for some components in order to control them, and we'll talk about the reason in next section. You can easily create an image button by specifying path at "image" attribute. Here we specify a absolute path (start with "/").
Book List Area. ZK provides several components to display a collections of data such as listbox, grid, and tree. We use listbox to display a list of book with 2 columns: Name and Price. The "row" attribute is used to control how many rows are visible and you can drag scroll-bar to see the rest of rows. The listbox is a container component, and you can add listhead to define a column. The listitem is used to display data, and the number of listcell corresponds to the number of listheader.
Extracted from search.zul
	 	<listbox id="productListbox" rows="5">
			<listhead>
				<listheader label="Name" />
				<listheader label="Price" />
			</listhead>
			<listitem>
				<listcell value="product name"></listcell>
				<listcell>$<label value="price" /></listcell>
			</listitem>
		</listbox>
Book Details Area. Like the hbox. vbox is a layout component which arranges its child component in vertical order. By combing these 2 layout components, we can present more information on a screen.
Extracted from search.zul
		<hbox style="margin-top:20px">
			<image id="thumbImage" width="250px" />
			<vbox>
				<label id="nameLabel" />
				<label id="priceLabel" />
				<label id="descriptionLabel"/>
			</vbox>
		</hbox>
You can see complete zul through the link in reference section. [6]
Manipulate UI
The next step after sketching the UI is to make UI interact with users. In ZK, we have 2 approaches to manipulate user interface, the first approach we introduce here is to control ZK UI component (Java object) directly by yourself. This approach is known as Model-View-Controller (MVC). [7] The View is UI, a composition of components. The Model consists of application data and business rules. The Controller plays as a coordinator between View and Model. It can change View's presentation and retrieve or update data in Model.
UI Controller
In order to control UI in ZK, you have to implement a controller class for a ZUL. You can simply extends SelectorComposer :
public class SearchProductComposer extends SelectorComposer<Window> {

}
- Line 1: Because we will use this controller on the window, we set generic type parameters of the SelectorComposer to Window.
After a composer is implemented, you can assign it to a component, such that the composer can control the component including its child components. Associating a composer to a component is just specifying full-qualified class name to the apply attribute of target component which you want to assign to.
	<window title="Search Product" width="800px" border="normal" style="padding-top:10px;padding-left:10px;"
	apply="tutorial.SearchProductComposer">
	<!-- omit other components for brevity -->
	</window>
Stuff a bunch of data
In our bookstore application, we hope our customers can see a list of all books when the page shows up at first. How to do this? With control-component-yourself (MVC) approach, you have to:
- get the listbox object
- set list of data to the listbox
Sound quite straightforward, right? We will describe how to do this step by step.
Retrieve ZK Component Object
One of SelectorComposer's features is allowing you to retrieve the UI component's object by annotating @Wire on controller's member variables.
File:Icon-tip.pngSteps:
- Declare a variable with corresponding component type (e.g. Listbox, Label...)
- Variable's name is the same as component's id. [8]
- Annotate the variable with @Wire.
Then SelectorComposer will "wire" a corresponding ZK component object to the variable you declared. After this has been done, you can then control and manipulate UI by accessing those annotated member variables.
public class SearchProductComposer extends SelectorComposer<Window> {

	@Wire
	private Listbox productListbox;

	//other codes...
}
- In mentioned search.zul, there is a listbox whose id is "productListbox". SelectorComposer will make productListbox reference to the listbox object after components are created.
Initialize ZK Component
Now you have retrieved the listbox object of the zul page, then we can stuff the data list into listbox by productListbox.setModel() . But when? You might think to do it in composer's constructor, but actually you'll get a null pointer exception if you do this. Because by the time a composer is constructed, ZK doesn't create UI components yet, your declared variables are still not assigned (wired) with component objects.
So how do you know when all components are created?
During ZK creates components for a zul with a composer, it will invoke a composer's life cycle methods. [9] It is like a notification of component creation progress. One of life cycle method is doAfterComposer() , it is called after all components including child components are created and member variables are wired with ZK components. That's the right place to set data list to productListbox.
<source lang="java" high="4">
public class SearchProductComposer extends SelectorComposer<Window> { @Override public void doAfterCompose(Window comp) throws Exception { super.doAfterCompose(comp); //initialize component's data productListbox.setModel(new SimpleListModel<Book>(bookService.findAll())); } } Line 4: Don't forget to call parent's doAfterCompose() , because it wires ZK component objects for you.
Handling User Action
When users select a listitem, we should show them the detail.
Bind UI Automatically
Binding data
Handling UI commands
Patterns Comparison
MVC v.s MVVM
When to use
Restriction
Unit Test ZK Application
ZK provides a unit test library, Mimic, which is one module of ZK Application Test Suite (ZATS).
Download
[Example application zip file]
Reference
- ↑ Create and Run Your First ZK Application Manually
- ↑ [http:// Book.java]
- ↑ [http:// BookService.java] [http:// BookServiceImpl.java]
- ↑ ZUML Reference
- ↑ ZK Component Reference
- ↑ [http:// source code of search.zul]
- ↑ MVC in Developer's Reference
- ↑ In fact, matching id is the default rule to match a component for @Wire, and please refer to Wire Components to know other ways
- ↑ Composer's life cycle methods


