ZK Alfresco Talk
Rui Monteiro, Engineer, MECATENA
January 24, 2009
ZK 3.5.2 and later, Alfresco 3.0 and later
Prerequisites
Abstract
This is a 'not so small' Smalltalk that shows how it's possible to delegate ZK page definitions to a remote system and in particular to an Alfresco DM (Document Manager) Server who is able to generate the zul pages dynamically and deliver them to our ZK webapp for local server processing. This way you will be able not only to separate content from presentation management but to manage the ZK presentation layer in a powerful ECM (Enterprise Content Management) system like Alfresco.
The Alfresco site URL:
The ZK site URL:
My company site URL:
Introduction
ZK is a great Open Source Easy Ajax framework, and Alfresco is a great Open Source ECM. Wouldn't be wonderful if we could combine the power of both technologies to produce great Enterprise Content and Easy Ajax Empowered Presentation Managed Systems?
Alfresco Web Scripts framework (extended in the last Alfresco's versions into the Alfresco Surf platform) offers a great and simple way to integrate its content repository with other systems in our network. With Alfresco's Web Scripts you can build very easily and in a High Availability mode the RESTful API you'll need to make SOA (Service Oriented Architecture). In reality, as you'll see later on, you will only need, at least for the most essential operations, a basic knowledge about Javascript and XML.
On the other side, ZK provides the easiest way for building RIA (Rich Internet Applications). But ZK by itself does not provide directly the tool to build systems with a clear separation between content and presentation layer, and neither the environment to control the ZK presentation layer remotely through the web. For that we would have to develop our own framework and ZK online page edition application. What Alfresco will give us is a robust and powerful way of having all this in the simplest way imaginable. Our objective here will be then to explore on the basic blocks necessary for such an integration between ZK and Alfresco.
An important note is to remind that the fact that both technologies, Alfresco and ZK, are Java based and even 'Spring friendly' (with Alfresco being developed with the Spring framework itself) is not important for the kind of SOA integration we will build. Both connecting points we will use, on Alfresco and on ZK side, are truly technologically neutral, so the same mechanism presented here could be used to integrate ZK with other ECM systems, or to integrate Alfresco with web presentation languages and frameworks other than ZK. And this is in reality one point plus in favour of our integration mechanism from a SOA point of view. But said so, and at least for Java/J2EE programmers, an integration between the best of the art ECM and Ajax Java based Open Source products available out there is of course very compelling on its own.
Installation
Please follow the installation guide according to your OS:
In this tutorial we will use an alfresco server installed locally with admin user (admin/admin) unchanged, and a zk web app called 'myweb' installed on the same tomcat that comes bundled with Alfresco. You can install it anywhere you want but then you will have to remember changing the server name and port of the urls in this tutorial.
How to get Alfresco session ticket
Alfresco is a secured content repository so we will need to be authenticated when connecting to it. For Alfresco Web Scripts specifically we will need an alfresco session ticket. You can get one for admin user directly from your browser if you go to http://localhost:8080/alfresco/service/api/login?u=admin&pw=admin (Note: the api/login is itself an alfresco web script that comes with the installation.) Make sure you have your alfresco started. You won't have to restart it not even once during this whole tutorial! So if everything goes well, you should get on your browser an XML answer like this:
<?xml version="1.0" encoding="UTF-8"?>
<ticket>TICKET_788803f02671592288c1e6eb9506c68b029baad3</ticket>
You can check more on Alfresco Session Tickets.
Now you can create on your zk web app a ZK script file in an inner folder like this WEB-INF/zs/ticket.zs with the following content:
import javax.xml.parsers.DocumentBuilderFactory;

ticket=null;

try{
	doc=DocumentBuilderFactory.newInstance().newDocumentBuilder().parse("http://localhost:8080/alfresco/service/api/login?u=admin&pw=admin");
	ticket=doc.documentElement.textContent;
}catch(Exception e){
    throw new Exception("Alfresco Connection Error!");
}
Our zs file above connects and fetches into a variable named ticket the alfresco session ticket for the admin user. (The try-catch is important since you probably don't want to show to your final users your alfresco's admin credentials in any possible stack error. On other side you can trust on error-page tomcat configuration if you prefer it, or you can use both.) Now create on the root of your zk web application a file named index.zul with the following content:
<zk>
	<zscript src="/WEB-INF/zs/ticket.zs"/>
	<label value="${ticket}"/>
</zk>
This is just for demonstration purposes since we will change this file later on. But now if you go to http://localhost:8080/myweb , you should see on screen the value of your alfresco ticket session.
Loading remote ZK pages
ZK has a powerful way of loading zul content that not necessarily corresponds to page definitions on our zk web application, through the usage of Executions.createComponents. We will use that on our file remote.zul that we will create on an inner folder of our zk web application named WEB-INF/zul next to the zs folder already created. This file will have the following content:
<zk>
	<zscript src="/WEB-INF/zs/ticket.zs"/>
	<div id="myfather"/>
	<zscript><![CDATA[
		import org.zkoss.idom.input.SAXBuilder;

		encoding="utf-8";
		arg_encoding=self.getDynamicProperty("encoding") ;

		if(arg_encoding!=null) {
			encoding=arg_encoding;
		}

		arg_url=self.getDynamicProperty("url");

		if(arg_url==null) {
			throw new Exception("url is mandatory");
		}

		pos=arg_url.indexOf("?");

		if(pos==-1) {
			arg_url+="?alf_ticket=";
		} else {
			arg_url+="&alf_ticket=";
		}

		arg_url+=ticket;

		try{
			doc=(new SAXBuilder(true,false)).build(arg_url);
		}catch(Exception e){
		    throw new Exception("Alfresco Connection Error!");
		}
		Executions.createComponentsDirectly(doc,null,myfather,null);
	]]></zscript>
</zk>
So remote.zul expects to receive encoding and url arguments, being the url mandatory. It loads an alfresco session ticket initially and appends it to the url passed in order to load remote zul components through usage of the Executions.createComponents method. But as you can see by its location this file is not supposed to be called directly but to be used as a macro component. So now we edit our already created index.zul file on the root directory of our zk web app in order to match the following:
<?xml version="1.0"?>
<?component name="remote" macro-uri="/WEB-INF/zul/remote.zul"?>
<zk>
	<remote url="http://localhost:8080/alfresco/service/myweb/index"/>
</zk>
If you call now http://localhost:8080/myweb you will get our Alfresco Connection Error! error stack since we did not create on Alfresco any webscript to match the one called: myweb/index. This comes next. By the way, we won't do anything else on our zk web application!
Creating ZK Webscripts in Alfresco
Generically Web Scripts in Alfresco are defined by an XML descriptor file, a Javascript file (to be executed on server) and a Freemarker file that defines the answer of our web script. So let's define our first Alfresco Web Script. To do that go to the login page of our Alfresco server (http://localhost:8080/alfresco) and authenticate ourselves as admin user. Navigate to Company Home/Data Dictionary/Web Scripts Extensions and create a space called myweb. On this new space we will create a file of type XML with the name index.get.desc.xml and with the content:
<webscript>
  <shortname>Myweb Index</shortname>
  <description>This should be your description</description>
  <url>/myweb/index</url>
  <format default="xml">extension</format>
  <authentication>admin</authentication>
</webscript>
Here we are saying that we want our webscript to be mapped in the myweb/index url, that its answer will have XML format by default, and in order to be executed the request will have have to be called by an admin user. (Besides all that the name of our file, index.get.desc.xml, says to Alfresco that the Web Script must be executed by the GET HTTP method.) Next we create in the same space Web Scripts Extensions another file this time of type Plain Text called index.get.xml.ftl. This will be our freemarker file (you can check more about Freemarker at their site http://freemarker.sourceforge.net) responsible for the final format of the answer of our webscript. For now we only want to check if everything is right so it could just be something like that:
<groupbox mold="3d">
    <caption label="Hello world!"/>
    <label value="How are you?"/>
</groupbox>
Now you could go in another window of your browser to the url: http://localhost:8080/alfresco/index . In this page you can list all webscripts available in your alfresco server, consult their definitions and you have in this same page a button to refresh the webscripts named Refresh Web Scripts. So click it. After that just refresh the browser window where you have your zk web app (http://localhost:8080/myweb). You should get something like that:
Now you have! Alfresco and your ZK web application are finally talking!
Don't stop talking
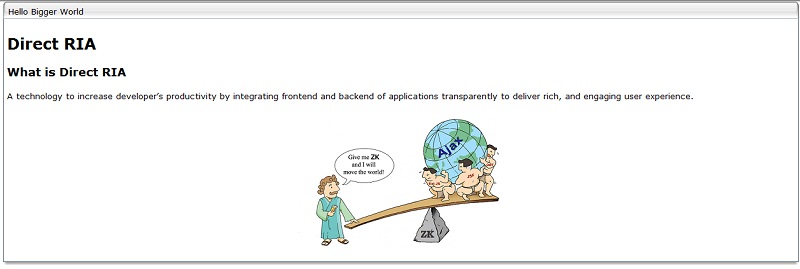
Ok it's cool but it could also be disappointing to some... So let's do more. Let's change our recently created webscript in Alfresco to read the caption of the groupbox and its content from somewhere else (don't forget to checkin any changes you made in a file in Alfresco). Go back to the Alfresco interface and navigate to Company Home (the root of your repository) and create in there a space called myweb, create a content page in your new space myweb called helloworld with a different title like Hello Bigger World and with content (in html format) "stolen from ZK web":
<h2>Direct RIA</h2> <a name="what"></a> <h3>What is Direct RIA</h3> <p>A technology to increase developer’s productivity by integrating frontend and backend of applications transparently to deliver rich, and engaging user experience.</p> <div align="center" style="margin-top: 20px; margin-bottom: 10px"><img src="http://www.zkoss.org/img/earth.png" alt="" /></div>
Get back to the myweb web scripts extensions folder and create a index.get.js file. This is going to be the javascript of our web script. The file should be Plain Text with content matching:
model.mynode=companyhome.childByNamePath("myweb/helloworld");
Everything you put in your variable model becomes available for you to use in your freemarker template, so let's edit now our old index.get.xml.ftl:
<groupbox mold="3d">
    <caption label="${mynode.properties.title}"/>
    <html><![CDATA[${mynode.content}]]></html>
</groupbox>
We are finally separating the content from the presentation layer, so now we can have different people editing content and dealing with the presentation skeleton. And both will be able to start taking profit from using a professional Document Management system for their work with all the intrinsic benefits from it, like versioning, checkin/checkout, workflow, online editing, etc. Now let's get back to http://localhost:8080/alfresco/index and refresh our webscripts and after that, reload our zk web app: http://localhost:8080/myweb Now you should see something like this:
So, how does it look now? Better, no? In case it was enough we can twist it a little bit. Let's edit our freemarket template index.get.xml.ftl:
<groupbox mold="3d">
    <caption label="${mynode.properties.title}"/>
    <zscript><![CDATA[
         showMe(){
              doc=(new SAXBuilder(true,false)).build("http://localhost:8080/alfresco/service/myweb/indexcontent?alf_ticket="+ticket);
              Executions.createComponentsDirectly(doc,null,mybox,null);
              showbutton.visible=false;
              hidebutton.visible=true;
         }
         hideMe(){
              mycontent.parent=null;
              showbutton.visible=true;
              hidebutton.visible=false;
         }
    ]]></zscript>
    <vbox  id="mybox">
        <button id="showbutton" label="Show Me" onClick="showMe();"/>
         <button id="hidebutton" label="Hide Me" onClick="hideMe();" visible="false"/>
    </vbox>
</groupbox>
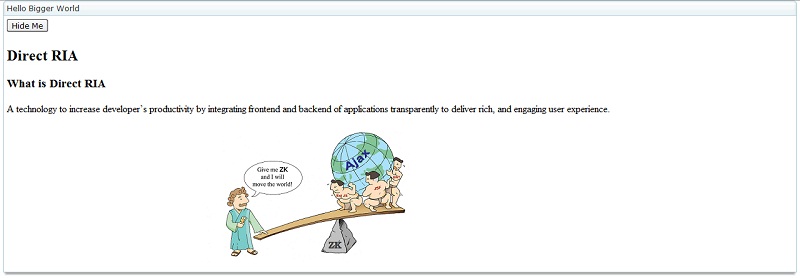
As you see the objective is to load dynamically another Alfresco ZK Webscript Page (myweb/indexcontent) in an event called inside an Alfresco ZK Webscript Page. So let's define our new webscript myweb/indexcontent. We start by the XML definition indexcontent.get.desc.xml:
<webscript>
     <shortname>Myweb Index Content</shortname>
     <description>This should be your description</description>
     <url>/myweb/indexcontent</url>
     <format default="xml">extension</format>
     <authentication>admin</authentication>
</webscript>
And after that the Javascript file indexcontent.get.js with the same statement as before since we are using the same content node in Alfresco (myweb/helloworld), so we will just import it:
<import resource="/Company Home/Data Dictionary/Web Scripts Extensions/myweb/index.get.js">
And finally the freemarker template indexcontent.get.xml.ftl of the new Web Script:
<html id="mycontent"><![CDATA[${mynode.content}]]></html>
We refresh our Alfresco web scripts all over again (http://localhost:8080/alfresco/index). And we go to our zk web app (http://localhost:8080/myweb), and we should see something like this:
We finally can have now an endless conversation between our ZK web application and our Alfresco server!
Last Chat
We are going to base ourselves this time on the example used by Jumper Chen in Working with Portal Layouts, but now let's take the benefits from defining specific metadata for our content in Alfresco. To do that we will navigate in Alfresco to the space Company Home/Data Dictionary/Models and create in there an XML content named myModel with the following content:
<model name="my:mymodel" xmlns="http://www.alfresco.org/model/dictionary/1.0">

   <!-- Optional meta-data about the model -->
   <description>My Model</description>
   <author></author>
   <version>1.0</version>

   <imports>
      <!-- Import Alfresco Dictionary Definitions -->
      <import uri="http://www.alfresco.org/model/dictionary/1.0" prefix="d"/>
      <!-- Import Alfresco Content Domain Model Definitions -->
      <import uri="http://www.alfresco.org/model/content/1.0" prefix="cm"/>
   </imports>

   <!-- Introduction of new namespaces defined by this model -->
   <namespaces>
      <namespace uri="my.mymodel" prefix="my"/>
   </namespaces>

   <aspects>

      <!-- Definition of new Content Aspect -->
      <aspect name="my:myportlet">
         <title>My Custom Portlet Aspect</title>
         <properties>
            <property name="my:height">
               <type>d:int</type>

            </property>
            <property name="my:iframesrc">
               <type>d:text</type>
            </property>
         </properties>
      </aspect>

   </aspects>

</model>
Make sure you check the property Model Active on the properties details window of our new document. As you see we created a new custom aspect named my:myportlet with information about height and iframe src. Next to that we need to configure Alfresco web client to present our new created aspect. We navigate then to Company Home/Data Dictionary/Web Client Extension and create an XML content named web-client-config-custom.xml that should match:
<alfresco-config>
        <!-- my.myportlet-->
        <config evaluator="string-compare" condition="Action Wizards">
             <aspects>
                  <aspect name="my:myportlet"/>
             </aspects>
        </config>
        <config evaluator="aspect-name" condition="my:myportlet">
             <property-sheet>
                  <separator name="sepCustInfo1" display-label="My Portlet Data" component-generator="HeaderSeparatorGenerator"/>
                  <show-property name="my:iframesrc"/>
                  <show-property name="my:height"/>
             </property-sheet>
         </config>
</alfresco-config>
Here we are saying that we want our aspect available to the action wizard (you'll see why) and how we want to see our aspect metadata in alfresco's interface. After that we go to http://localhost:8080/alfresco/faces/jsp/admin/webclientconfig-console.jsp and execute the command reload, you should see at the bottom a line like this:
workspace://SpacesStore/app:company_home/app:dictionary/app:webclient_extension/cm:web-client-config-custom.xml ---> OK
This says your alfresco web client extension was successfully loaded.
Now we navigate to our space Company Home/myweb and create in there a space called myportlets. Navigate inside the new space and choose the option Manage Content Rules and after that choose Create Rule. For Step One - Select Conditions choose Items of a specified type or its sub-types, click then on the Set Values And Add button and select type Content, click the Ok button. Click the Next button. For Step Two - Select Actions choose Add aspect to item and then again click the Set Values and Add button, you should see your new My Custom Portlet Aspect on the list, select it and click the Ok button. Click the Next button. For the Step Three - Enter Details give a title to this content rule, let's say myportletcontentrule, make sure you check the Apply rule to sub spaces option and save your rule.
You just created an automatic content rule on the Company Home/myweb/myportlets space which says that to every content (not space) created in it or in a subspace it should be applied your own custom portlet aspect.
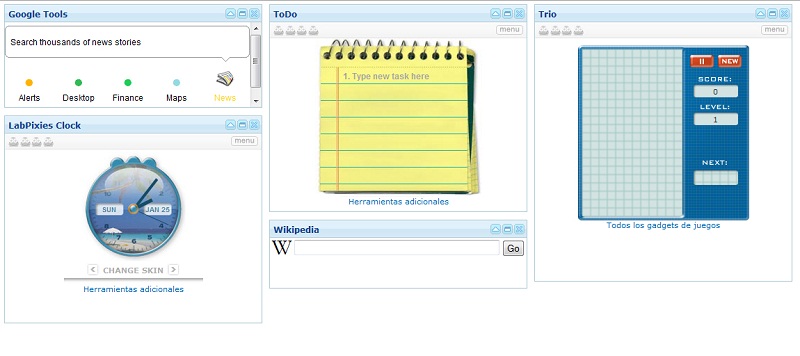
Now create on the Company Home/myweb/myportlets three spaces, let's call them column1, column2 and column3. Go to column1 and create two content items. Their names, type or content will not be important but for the sake of organization we will call them myportlet1 and myportlet2. On myportlet1 in the details view you'll see you have now your portlet aspect metadata available to set, edit them, giving for title Google Tools, for your height metadata put 150 and for the iframesrc put
http://3.gmodules.com/ig/ifr?url=http://www.google.com/ig/modules/toolspromo.xml&nocache=0&lang=en&country=us&.lang=en&.country=us&synd=ig&mid=3&ifpctok=5090480830848781425&parent=http://www.google.com&extern_js=/extern_js/f/CgJlbhICdXMrMAs4ACwrMBA4ACwrMBI4ACwrMBM4ACw/zYieI_ujwr4.js
. On my portlet2 put for the same fields the values: LabPixies Clock, 300 and
http://34.gmodules.com/ig/ifr?url=http://www.labpixies.com/campaigns/clock/mini_clock.xml&nocache=0&up_skin_id=&upt_skin_id=hidden&lang=en&country=us&.lang=en&.country=us&synd=ig&mid=34&ifpctok=-3234052241260630457&parent=http://www.google.com&extern_js=/extern_js/f/CgJlbhICdXMrMBI4ACwrMBM4ACw/v3vgcgA0x8g.js
. Go to column2 and create in there another two documents called myportlet1 and myportlet2. For the myportlet1 edit the same fields with the values: ToDo, 300 and
http://cj399o2i-a.gmodules.com/ig/ifr?url=http://www.labpixies.com/campaigns/todo/todo.xml&nocache=0&up_saved_tasks=&upt_saved_tasks=hidden&lang=en&country=us&.lang=en&.country=us&synd=ig&mid=31&ifpctok=-1474109439244469874&parent=http://www.google.com&extern_js=/extern_js/f/CgJlbhICdXMrMBI4ACwrMBM4ACw/v3vgcgA0x8g.js
. And for myportlet2: Wikipedia, 100 and
http://29.gmodules.com/ig/ifr?url=http://wpsearchbar.wikia.com/common/wpsearchbar.xml&nocache=0&up_mylang=&upt_mylang=enum&lang=en&country=us&.lang=en&.country=us&synd=ig&mid=29&ifpctok=4012247812086609177&parent=http://www.google.com&extern_js=/extern_js/f/CgJlbhICdXMrMBI4ACwrMBM4ACw/v3vgcgA0x8g.js
. Finally go to column3 and create only myportlet1 with values: Trio, 400 and
http://35.gmodules.com/ig/ifr?url=http://www.labpixies.com/campaigns/trio/trio.xml&nocache=0&lang=en&country=us&.lang=en&.country=us&synd=ig&mid=35&ifpctok=7430207052966295609&parent=http://www.google.com&extern_js=/extern_js/f/CgJlbhICdXMrMBI4ACwrMBM4ACw/v3vgcgA0x8g.js
.
Now let's edit our webscript. Edit the index.get.js to match:
model.mynode=companyhome.childByNamePath("myweb/myportlets");
Then edit the freemarker file index.get.xml.ftl to match:
<?xml version="1.0"?>
<zk>
	<portallayout>
                <#list mynode.children as mycolumn>
                <#if mycolumn.isContainer>
		<portalchildren width="30%" style="padding: 5px">
                        <#list mycolumn.children as myportlet>
			<panel height="${myportlet.properties['my:height']}px" title="${myportlet.properties.title}"  collapsible="true" closable="true" maximizable="true" style="margin-bottom:10px" border="normal">
				<panelchildren>
					<iframe src="${myportlet.properties['my:iframesrc']}" width="100%" height="100%"/>
				</panelchildren>
			</panel>
                        </#list>
		</portalchildren>
                </#if>
                </#list>
      </portallayout>
</zk>
Refresh the same way as before your alfresco webscripts (http://localhost:8080/alfresco/service/index). And then go and refresh your zk web application (http://localhost:8080/myweb). You should get this:
Isn't it great? We can use Alfresco now to organize, configure and extend our portal layout in the most easy way.
Summary
In this article, we saw how to connect a ZK web application to Alfresco to be managed at both levels: content and presentation layer. We learned how to generate ZK pages dynamically on Alfresco using simple javascript and freemarker templates. We learned as well how to take advantage of the possibility of configuring custom metadata and automatic content rules on Alfresco in order to define the content model that best suites our final ZK web application needs. And we saw how all this can be done with no restarts, always online and only on the Alfresco side without ever touching our ZK web application itself. Finally the mechanism explained in this tutorial could be used as a starting building block to be extended in order to take full advantage of Alfresco DM facilities like workflow, users profiles and permissions, versioning, checkin/checkout, etc., in order to create top class ZK Totally Alfresco Managed Web Solutions.
| Copyright © Rui Monteiro, MECATENA. This article is licensed under GNU Free Documentation License. |


